Admit candidates for an exam
Proctors use the Proctoring application to admit candidates for their exams. When candidates register for an exam at a testing site, all candidates registered for that day's testing appear in all events for that site on that day in the Candidate admissions roster section of the page. This allows multiple proctors to admit candidates for exams. Proctors may only admit candidates for exams that are scheduled for the current day. If no candidate registrations are made for the current day, the Candidate admissions list is empty.
|
The browser must be configured for the same time zone as the location of the event where the candidate is taking the exam. For example, if a proctor is based out of New York they would have their proctor laptop typically configured for the Eastern time zone. The proctor then travels to Las Vegas for the event. They must configure their browser to the Pacific time zone to accurately reflect the roster for the event in Las Vegas. If they do not synchronize the browser to the event location, the roster may not list all the candidates scheduled for the exam. |
Search for candidates
There are two methods of searching for candidates. You may use the advanced search feature, or you may use the advanced filter feature.
|
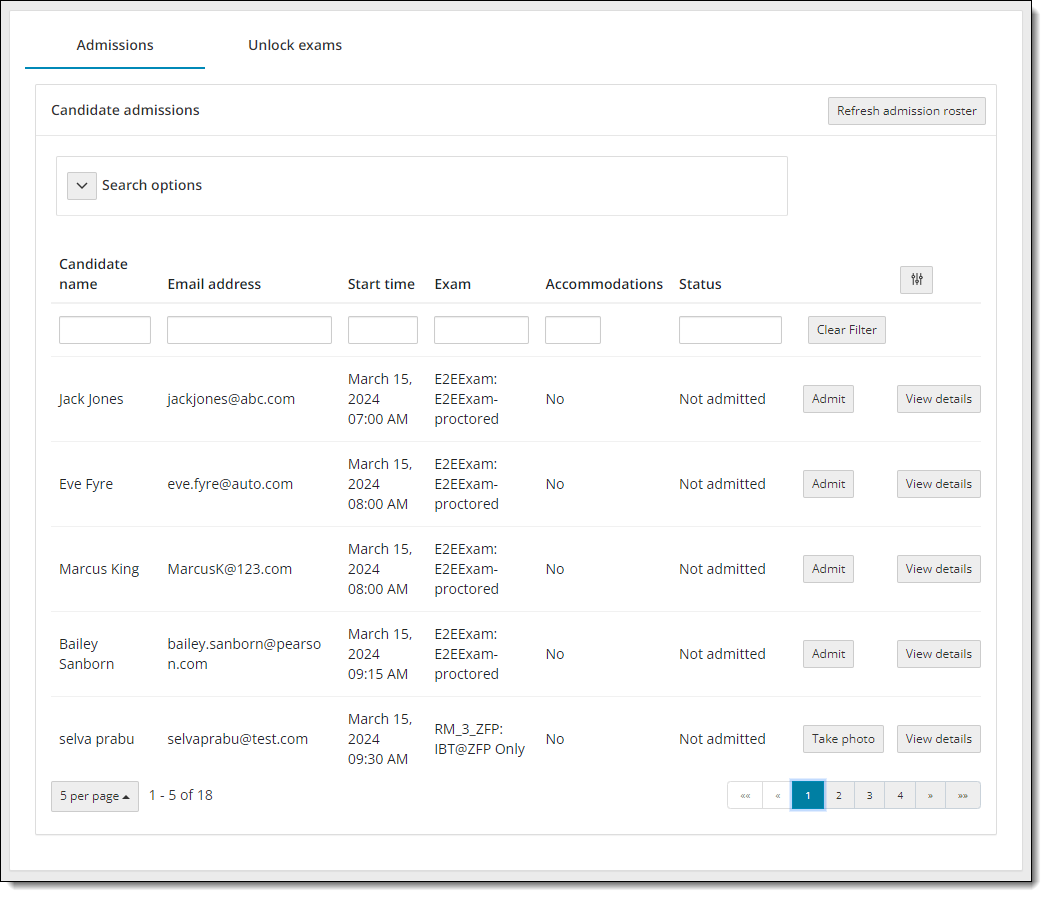
By default, the Admissions list roster displays the first 50 exam registrations at your site for the current date. If there are more than 50 registrations listed on the Admissions roster use the page links in the bottom right-hand corner to advance through the pages of registrations. The exam registrations are listed by exam start time. |
- On the Events dashboard, locate the desired Event in the Events list.
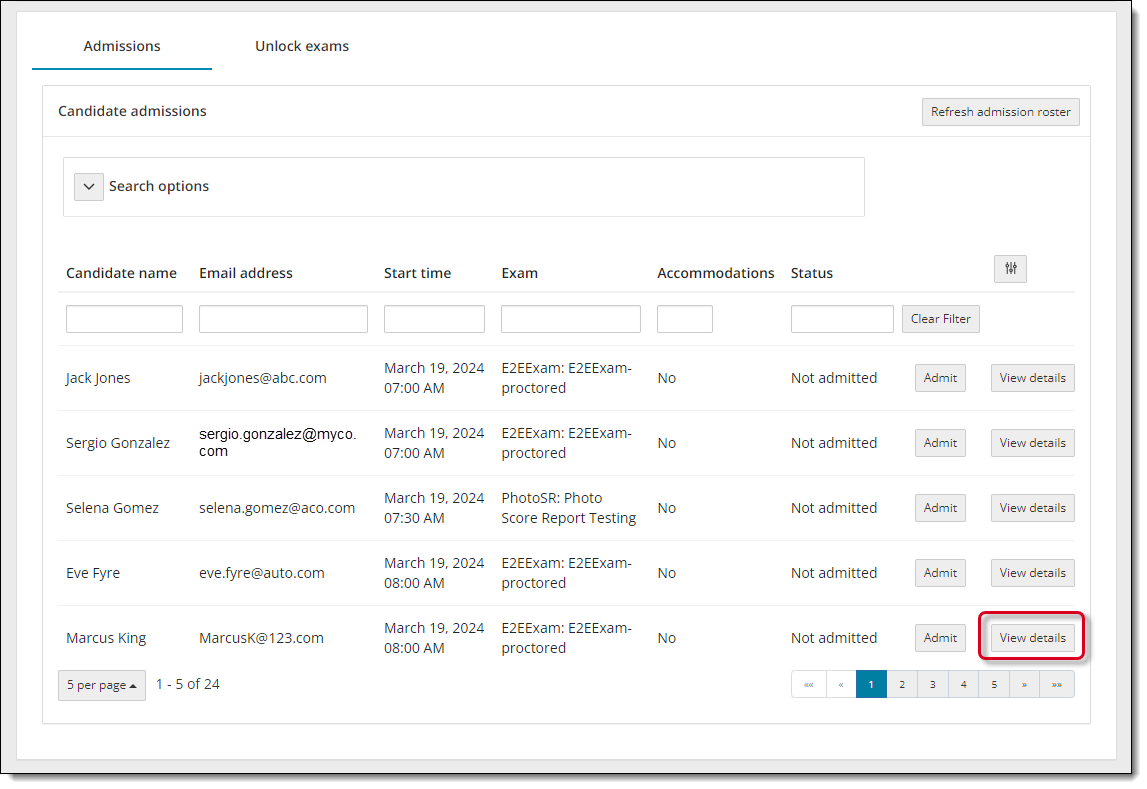
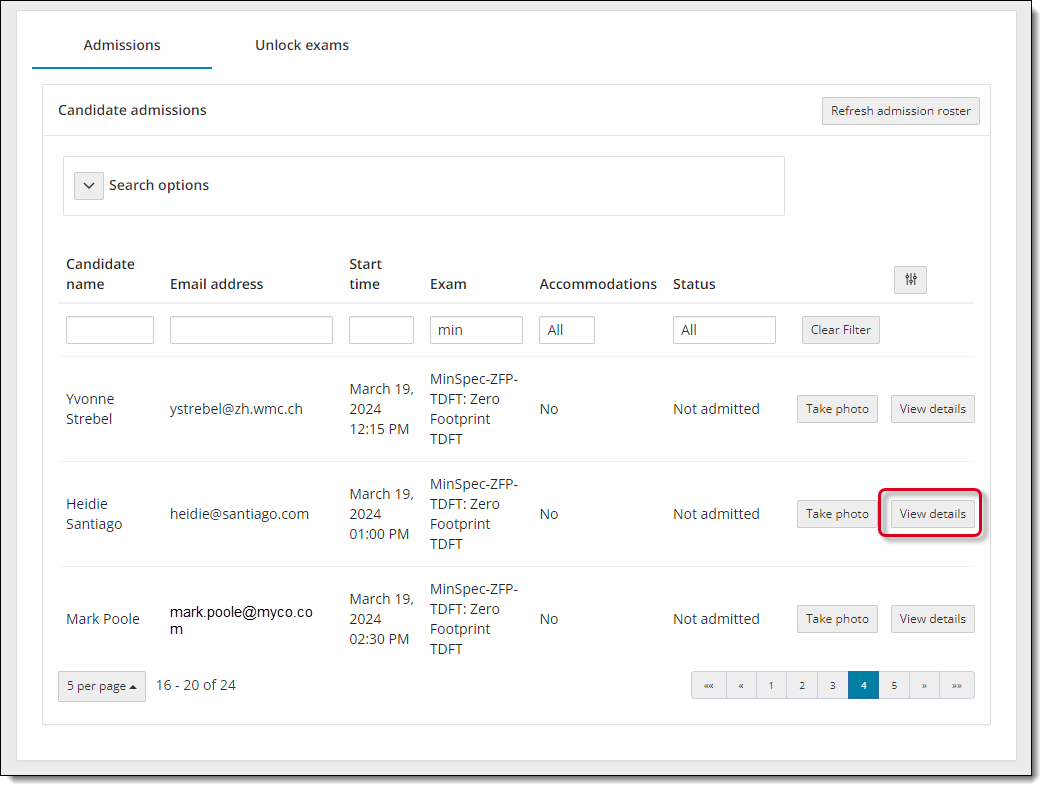
- Click the View button. The Event details page opens. For clients that require a photo of the candidate, the registration displays the Take photo button. For clients that do not require a photo of the candidate, the registration displays the Admit button.


Candidate Admissions roster for registrations without photo capture requirement
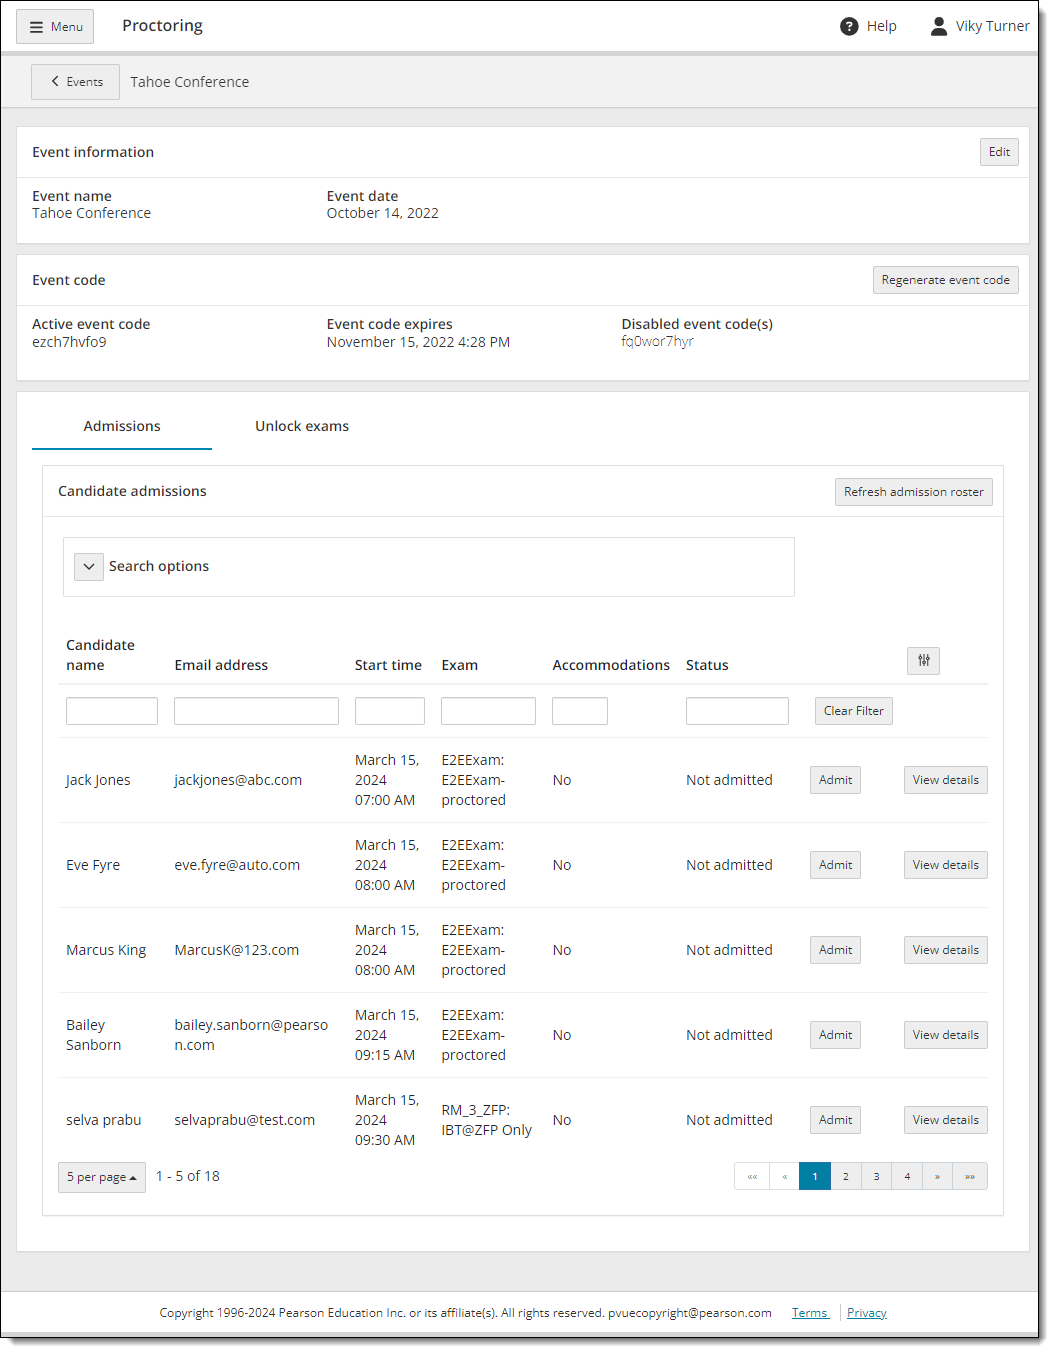
Candidate Admissions roster for registrations with photo capture requirement
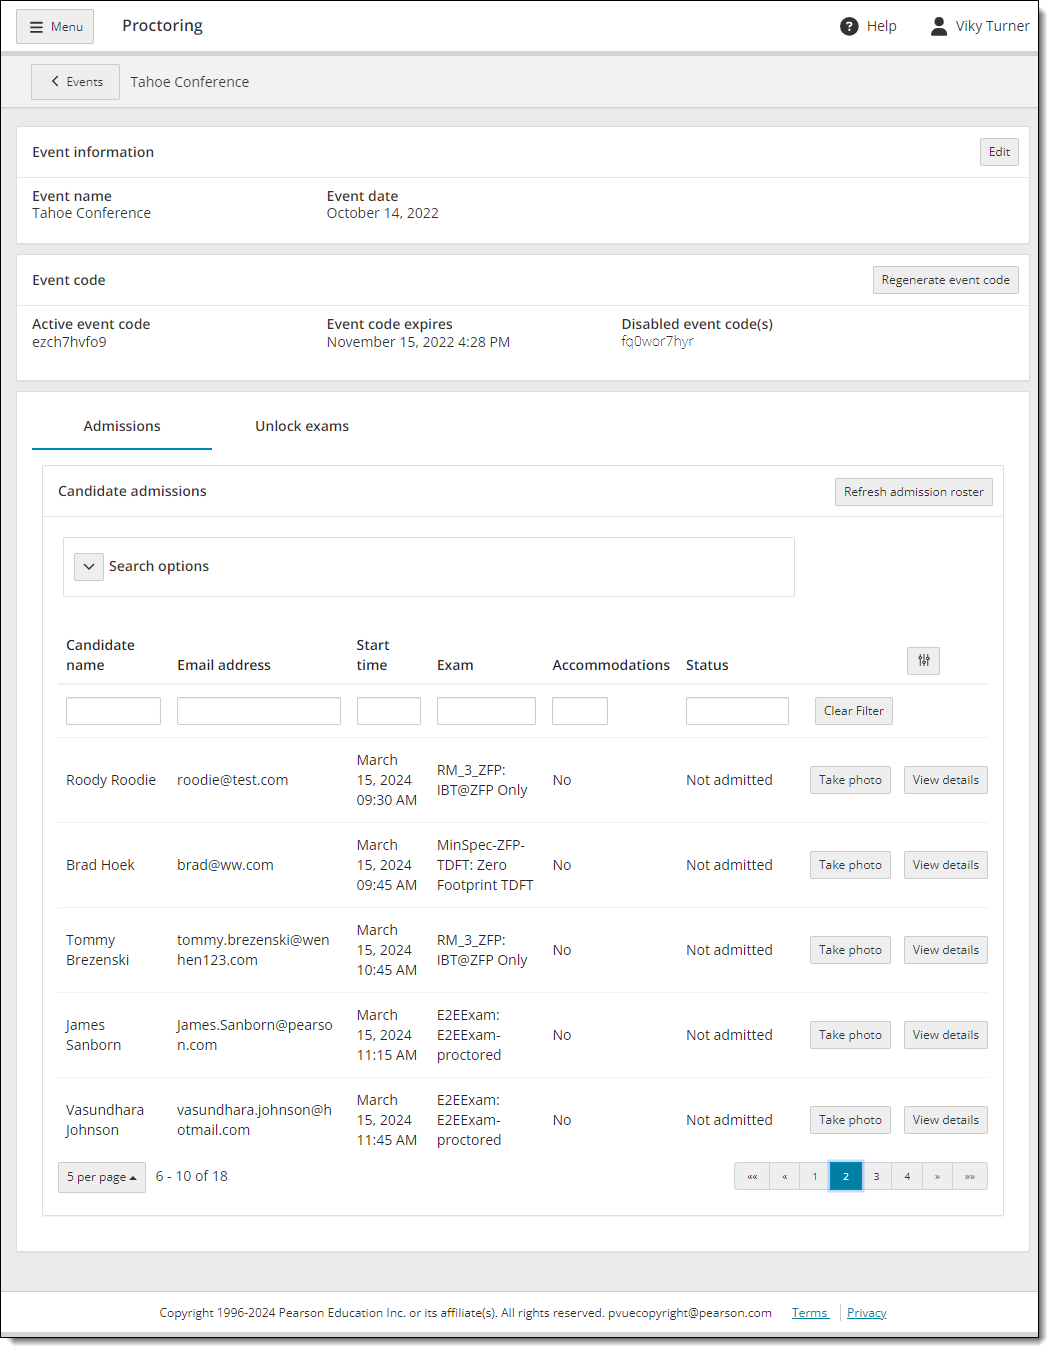
- Click the Refresh candidate roster button.
- As each candidate arrives, check their ID, and locate the desired candidate in the admissions list.
Search for candidate using the advanced search feature
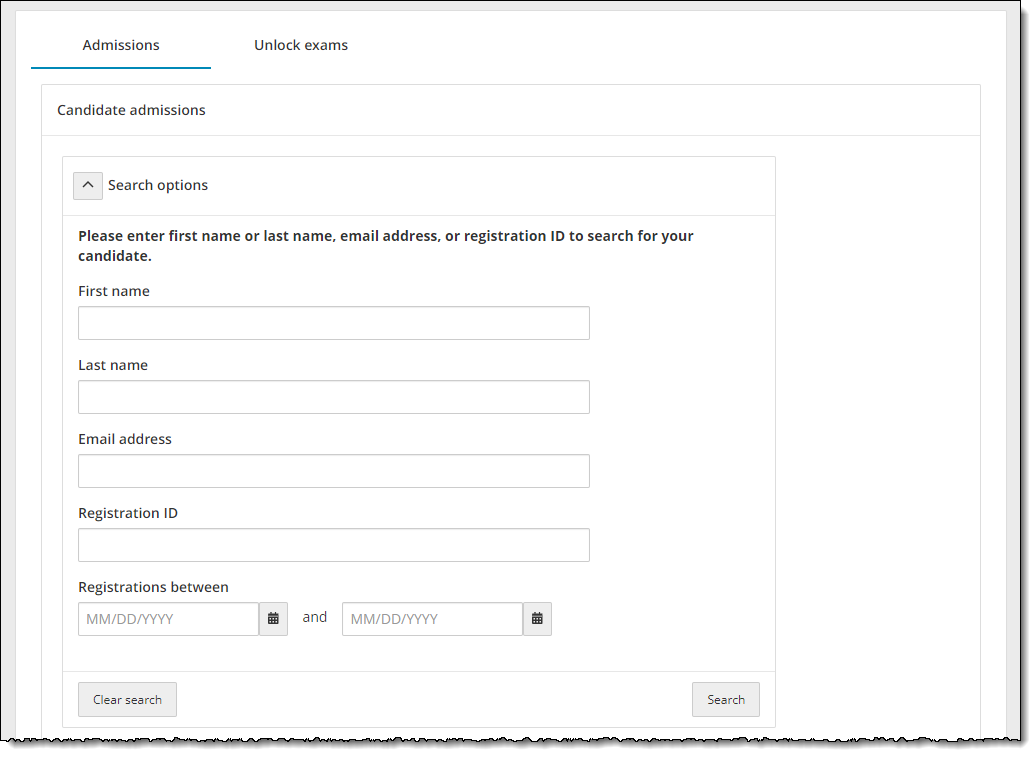
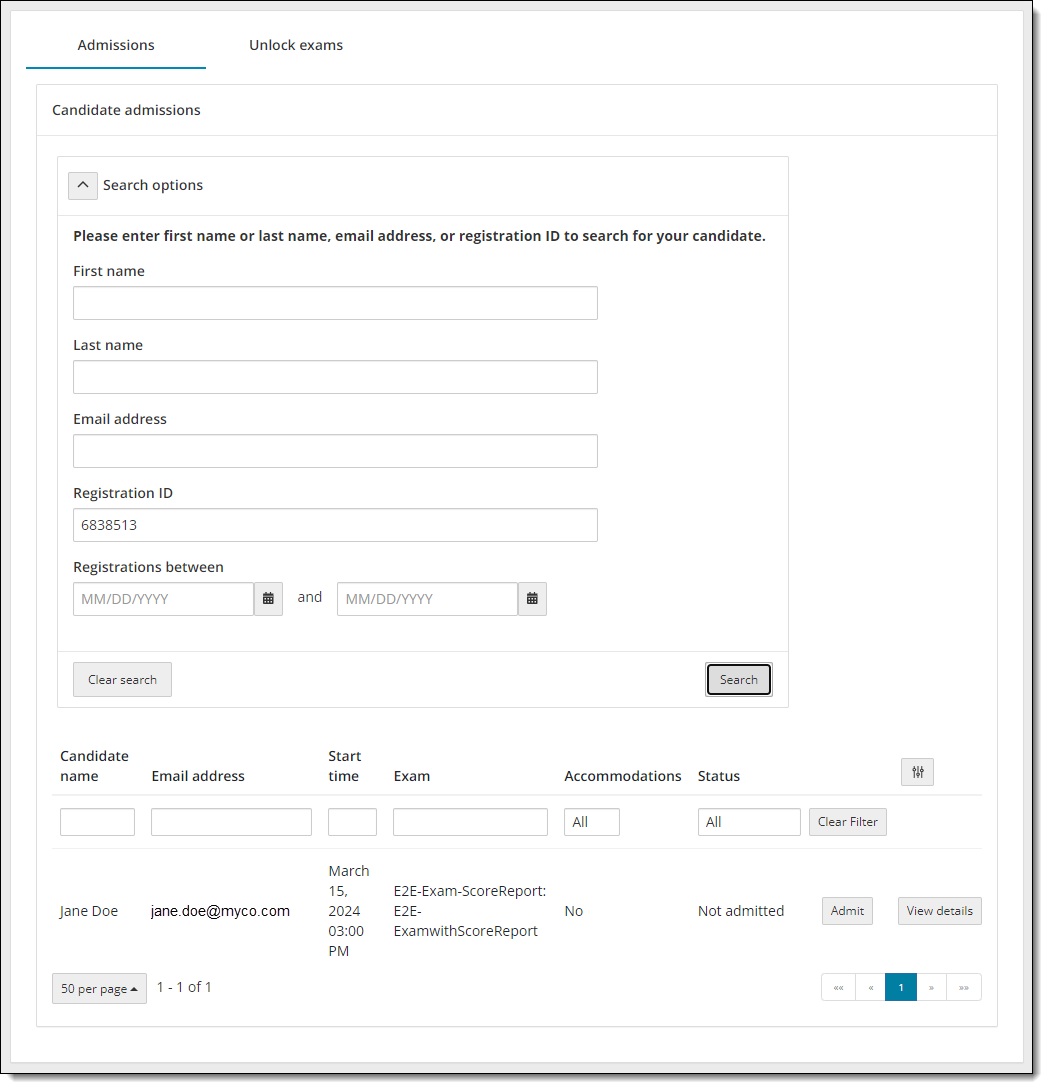
If there is a long list of exam registrations, you may use the Advanced search feature to locate the desired exam registration. You may locate an exam registration by candidate first name, last name, email address, Registration ID, and registration dates. The list is filtered to display the exam registrations that match the selected search criteria.
|
The Refresh admission roster button is hidden when the Search fields are displayed. As soon as you hide the search fields the Refresh admission roster button is displayed once again. |
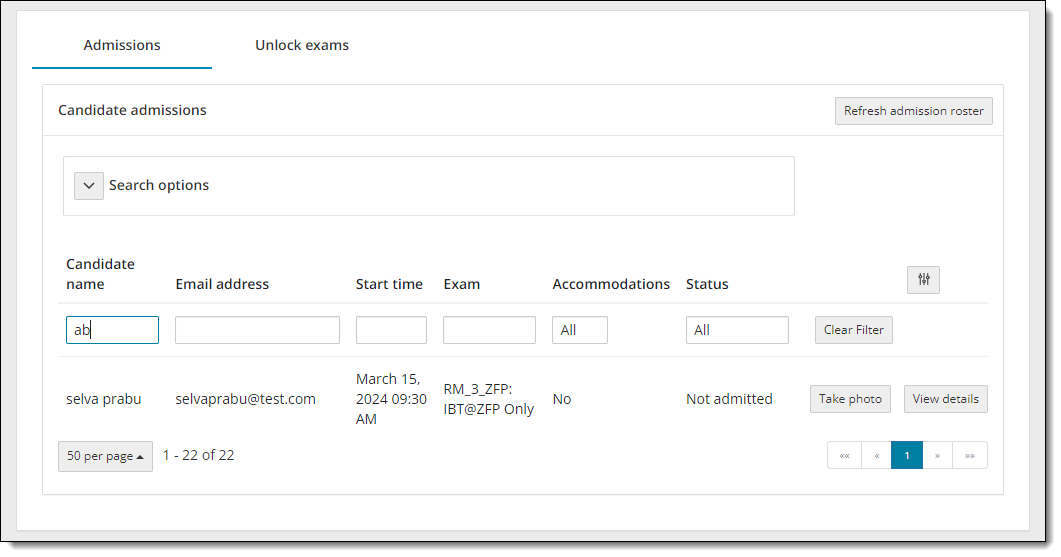
- Search by candidate name.
|
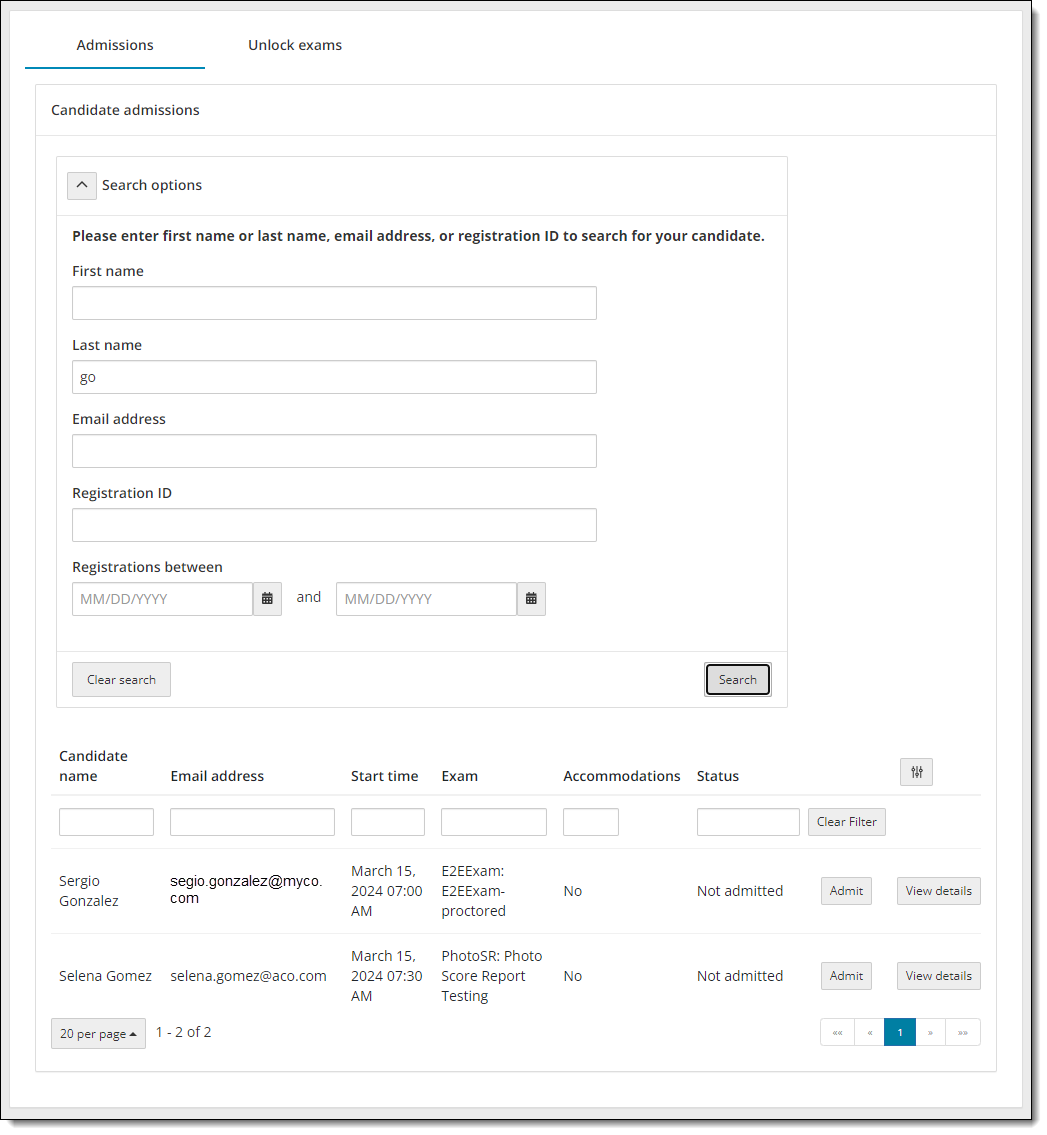
You can search by only first name, only last name, or first name and last name. Partial searches are allowed. These fields are not case sensitive. You must enter the first two or more characters in the first name or last name field. You cannot search for characters in the middle of a name, just the beginning characters in either the first or last name. For instance, if you are looking for the registration for Sergio Gonzales, you could enter go in the Last name field. All candidates matching the entered text are displayed.
|
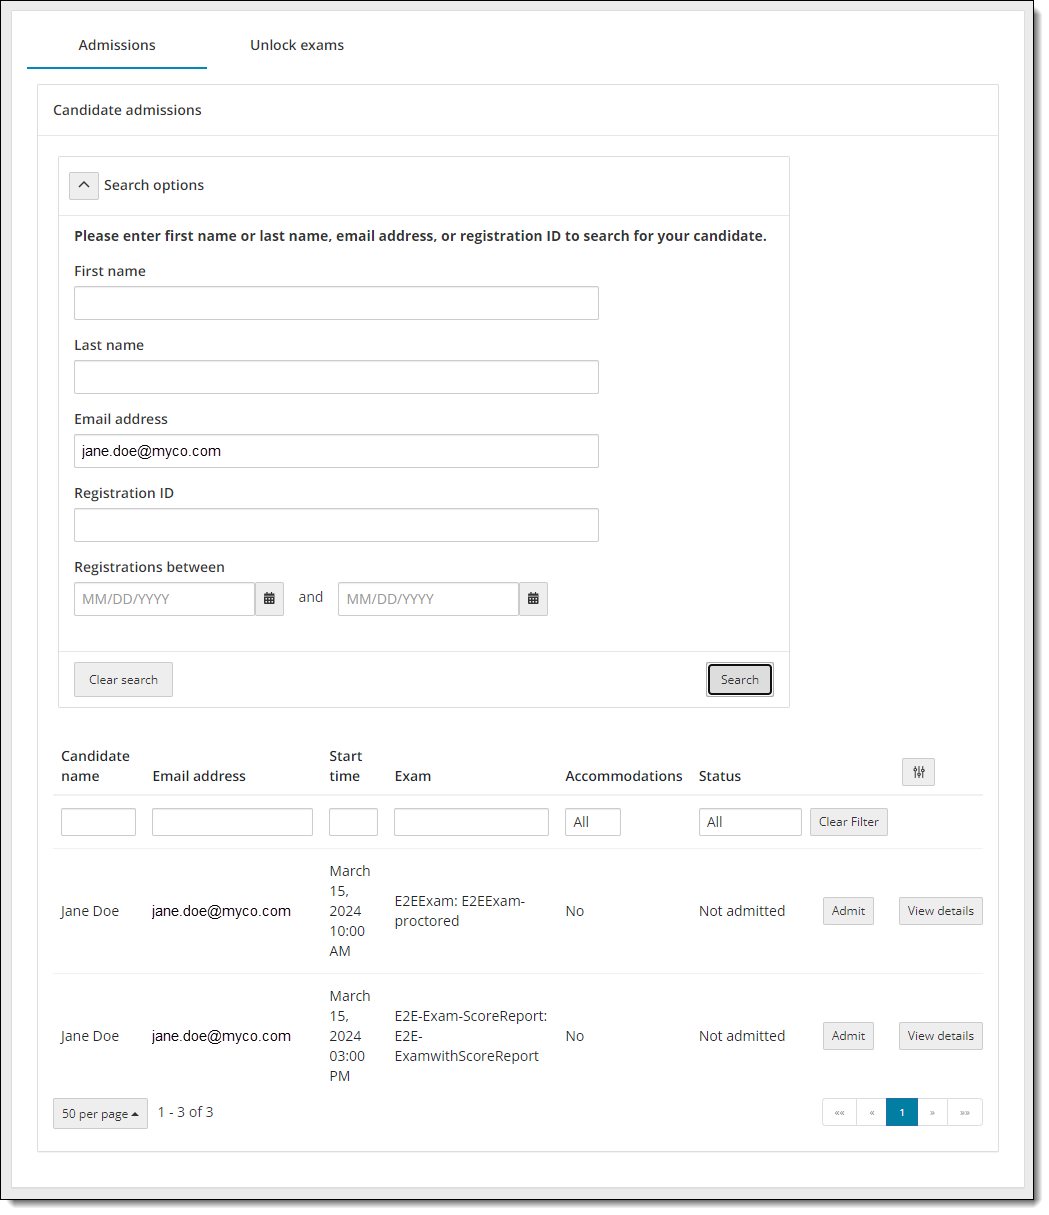
- Search by Email Address.
- Search by Registration ID.
|
You must enter a valid registration ID for an exam registration for the current date. If you do not enter a valid registration ID for the current date, the table at the bottom of the page states there are no search results. |
- Search for Registrations from a day before the current date through a week from the current date.
- Click the Calendar button for the beginning registration date range. You can select either the current date or the day before the current date for the first registration date range.


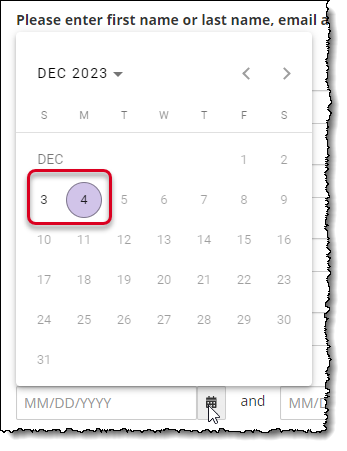
- Click the Calendar button for the ending registration date range. You can select from the current date through a week from the current date for the second registration date range.


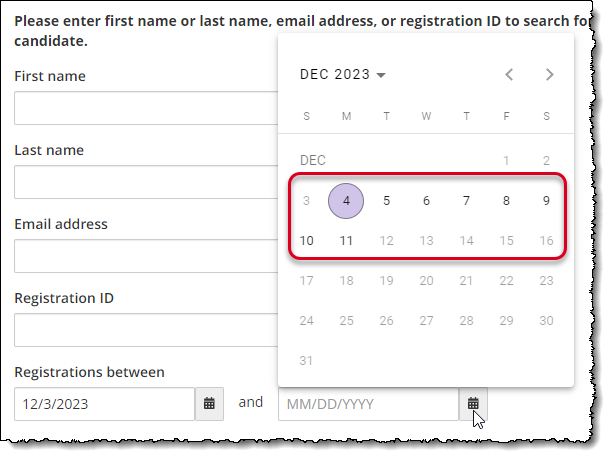
- Select the Search button. The registration(s) that match the search criteria are displayed.


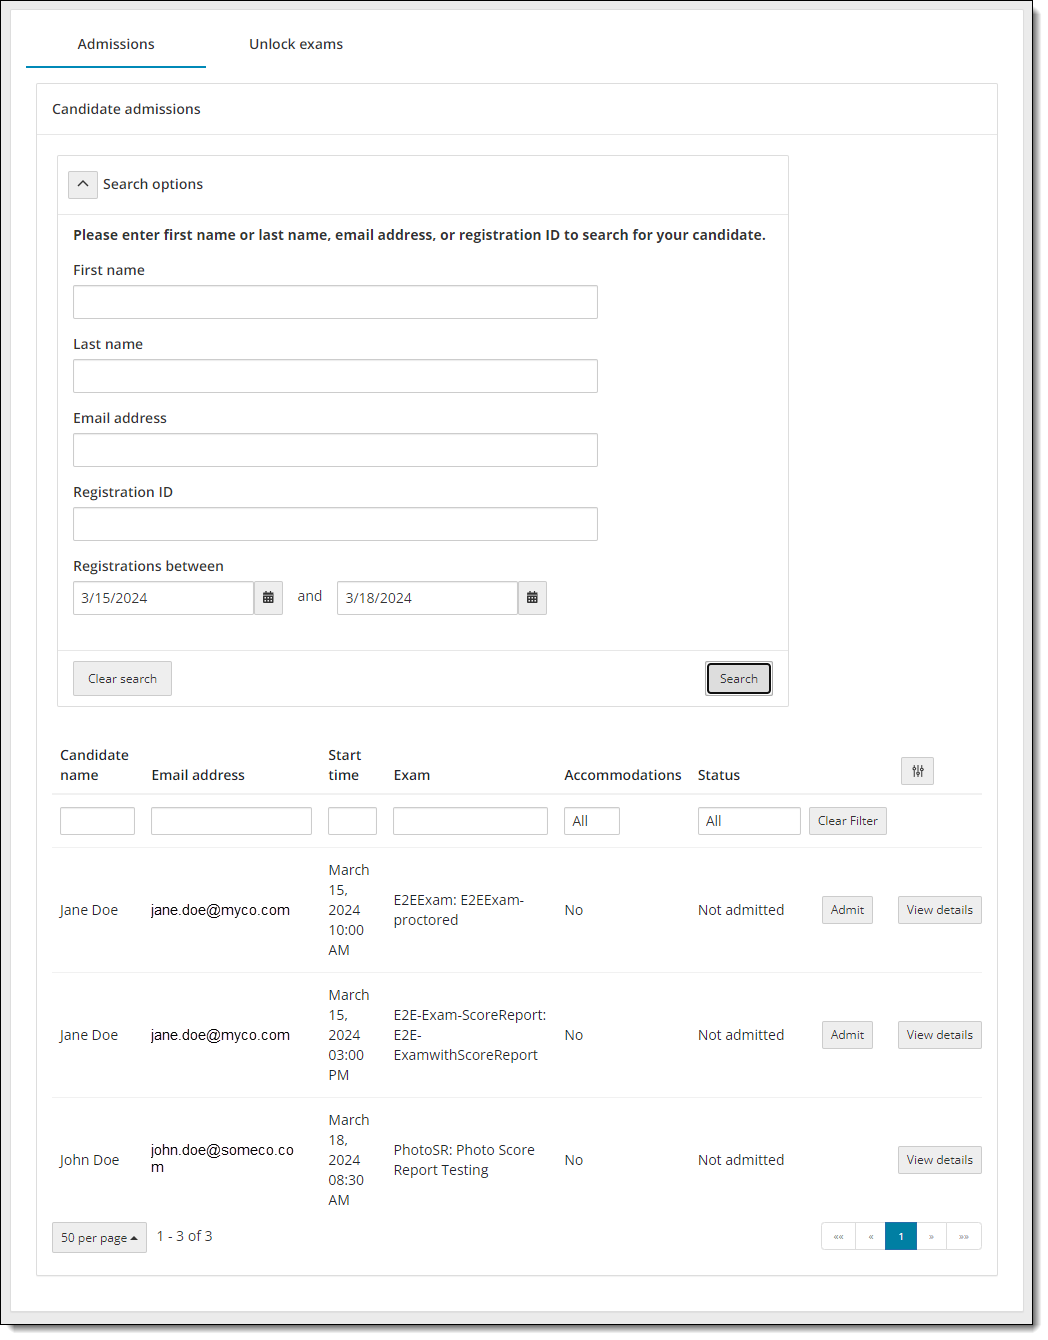
- Click the Calendar button for the beginning registration date range. You can select either the current date or the day before the current date for the first registration date range.
- Hide the search fields by clicking the Search options button once you have filtered the list to match the desired list of exam registrations.
|
The Refresh roster button is hidden when the Search options are displayed on the page. The Refresh roster button appears once you hide the Search options fields. If you select the Refresh roster button with the Admissions roster filtered by the search criteria, only those registrations that match the search criteria are displayed. You must display the search options and select the Clear Search button. Then all the exam registrations appear on the roster list when you refresh the roster. |
Search for candidate using the advanced filters
By default, when you view an event the advanced filter fields are displayed above the list of exam registrations on the Admissions tab. You can locate an exam registration by candidate name, email address, exam start time, exam code or exam name, exams with or without accommodations, or exam status.
|
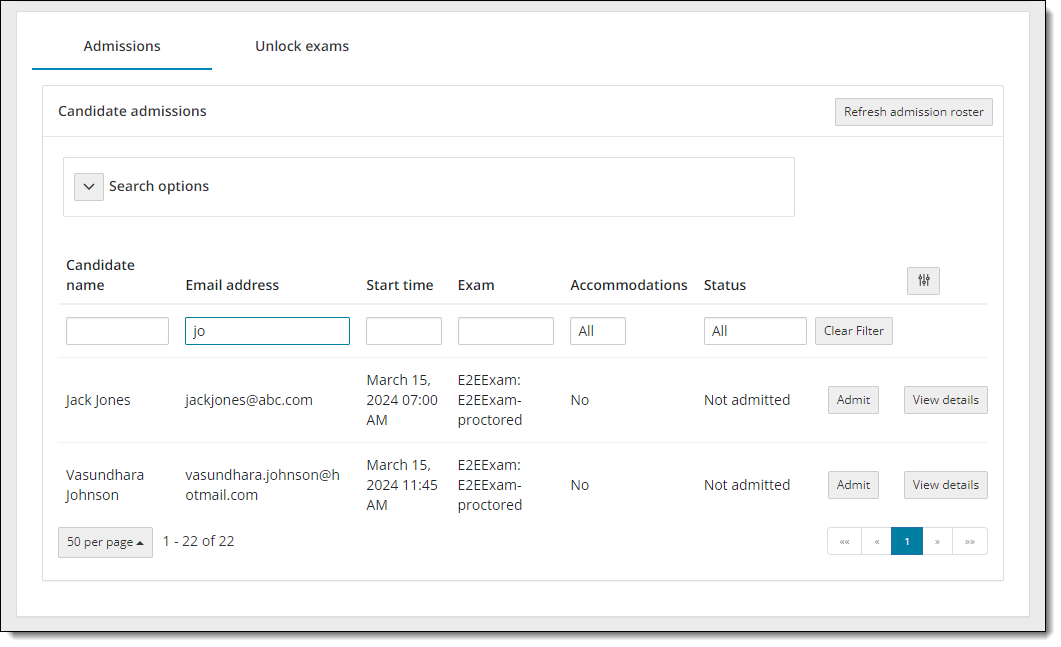
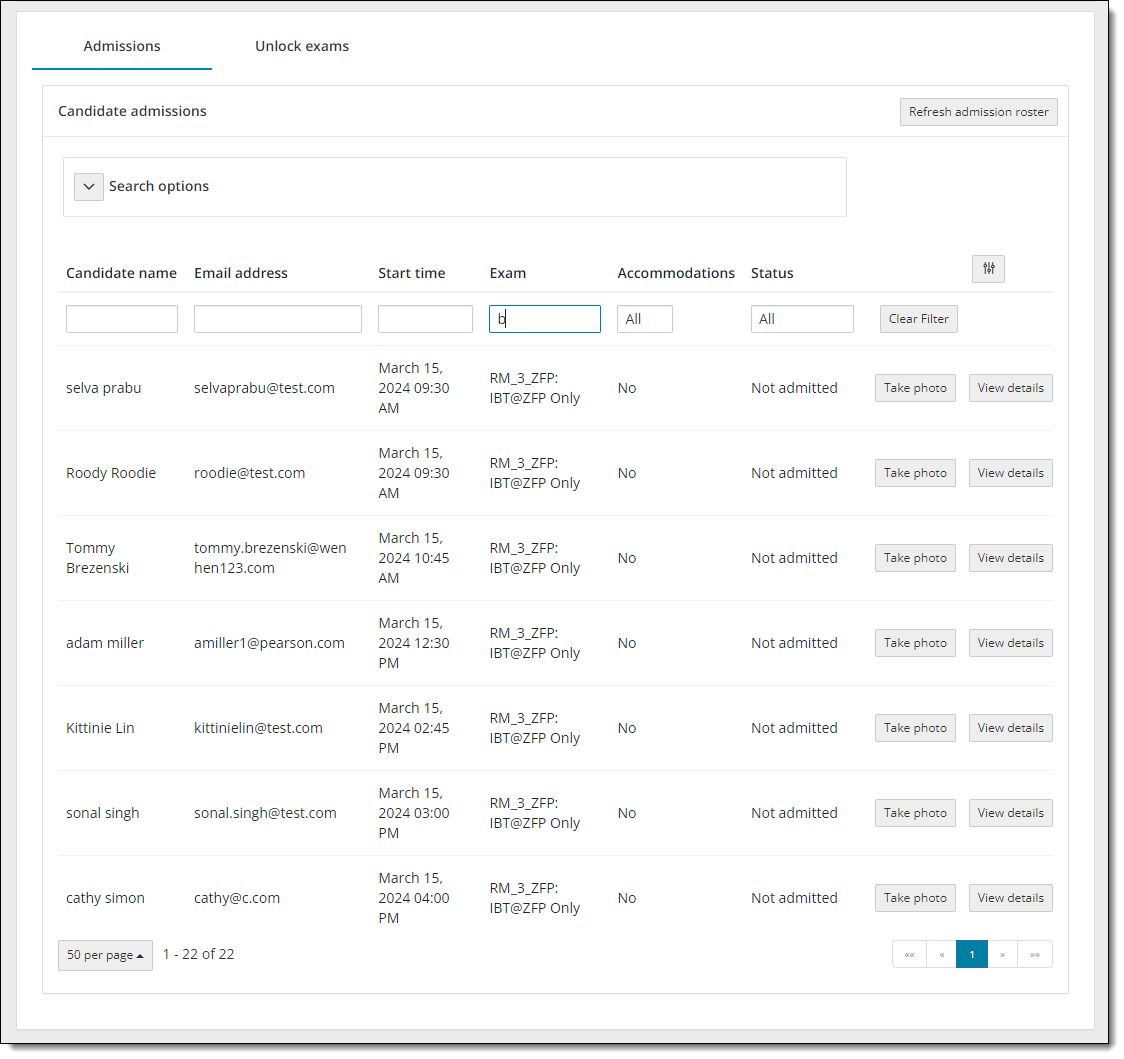
The Candidate name, Email address, Start time, and Exam advanced filter fields are intuitive. You can search for any string of characters that appear in the desired field. As soon as you start typing in the field, the list is dynamically filtered to match the criteria you have entered in the filter field. |
- Click the Show/Hide advanced filter
 button to toggle between displaying the advanced filter fields or hiding them.

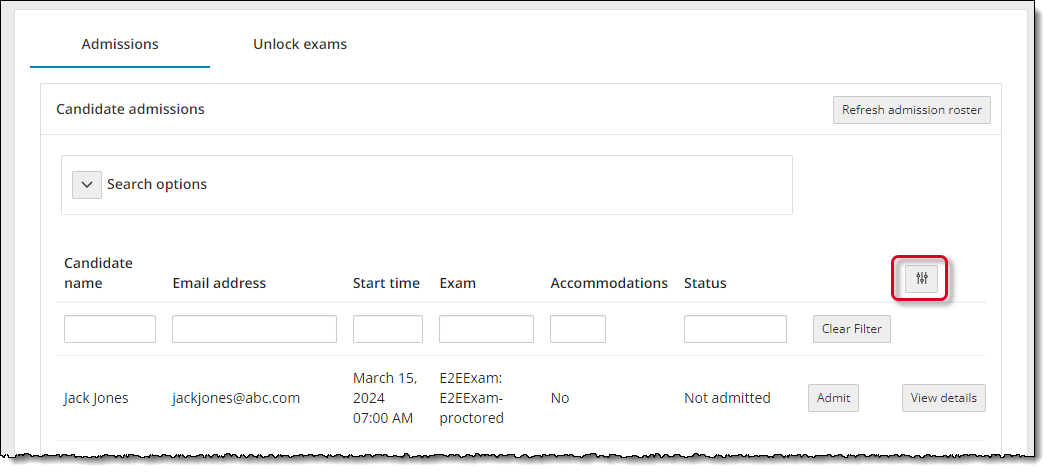
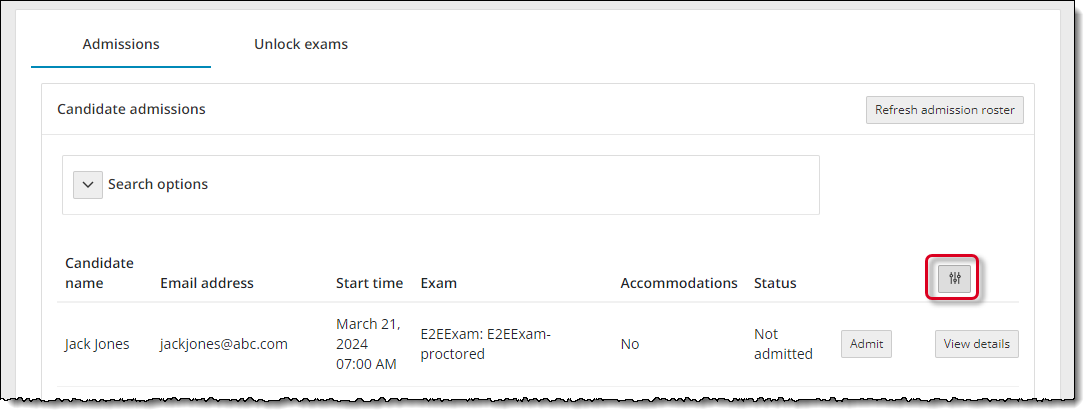
|
The advanced filter fields only look at the list of exam registrations that are currently displayed on the Admissions tab. This may be a subset of all the exam registrations set to be delivered on the current date at your test site (for example, you are displaying 20 on a page and there are 5 pages). If the filtered list is empty on the current page, use the page buttons in the lower right-hand corner to view the following pages. The advanced filter retains your criteria as you move from page to page and displays any exam registrations that match the criteria as you move through the pages. The advantage of using the advanced filter is that you can enter any string of characters in the filter field to locate the desired exam registration. If you have the admissions list filtered by using the advanced search feature, the advanced filter fields only search the exam registrations that are in the subset of exam registrations. The system does not search the entire list of exam registrations for your site on the current day. (For example, the advanced search returned 175 exam registrations instead of 400. The advanced filters only act on the 175 exam registrations, not the full 400.) If you need to search the entire list to locate the desired exam registration without scrolling through pages, use the advanced search feature instead. |
- Filter by Candidate name.
- Filter by Email address.
- Filter by Start time.
- Enter any string of characters in the Start time field.
- Enter pm and the list is filtered to display only exam registrations that will be delivered in the afternoon.


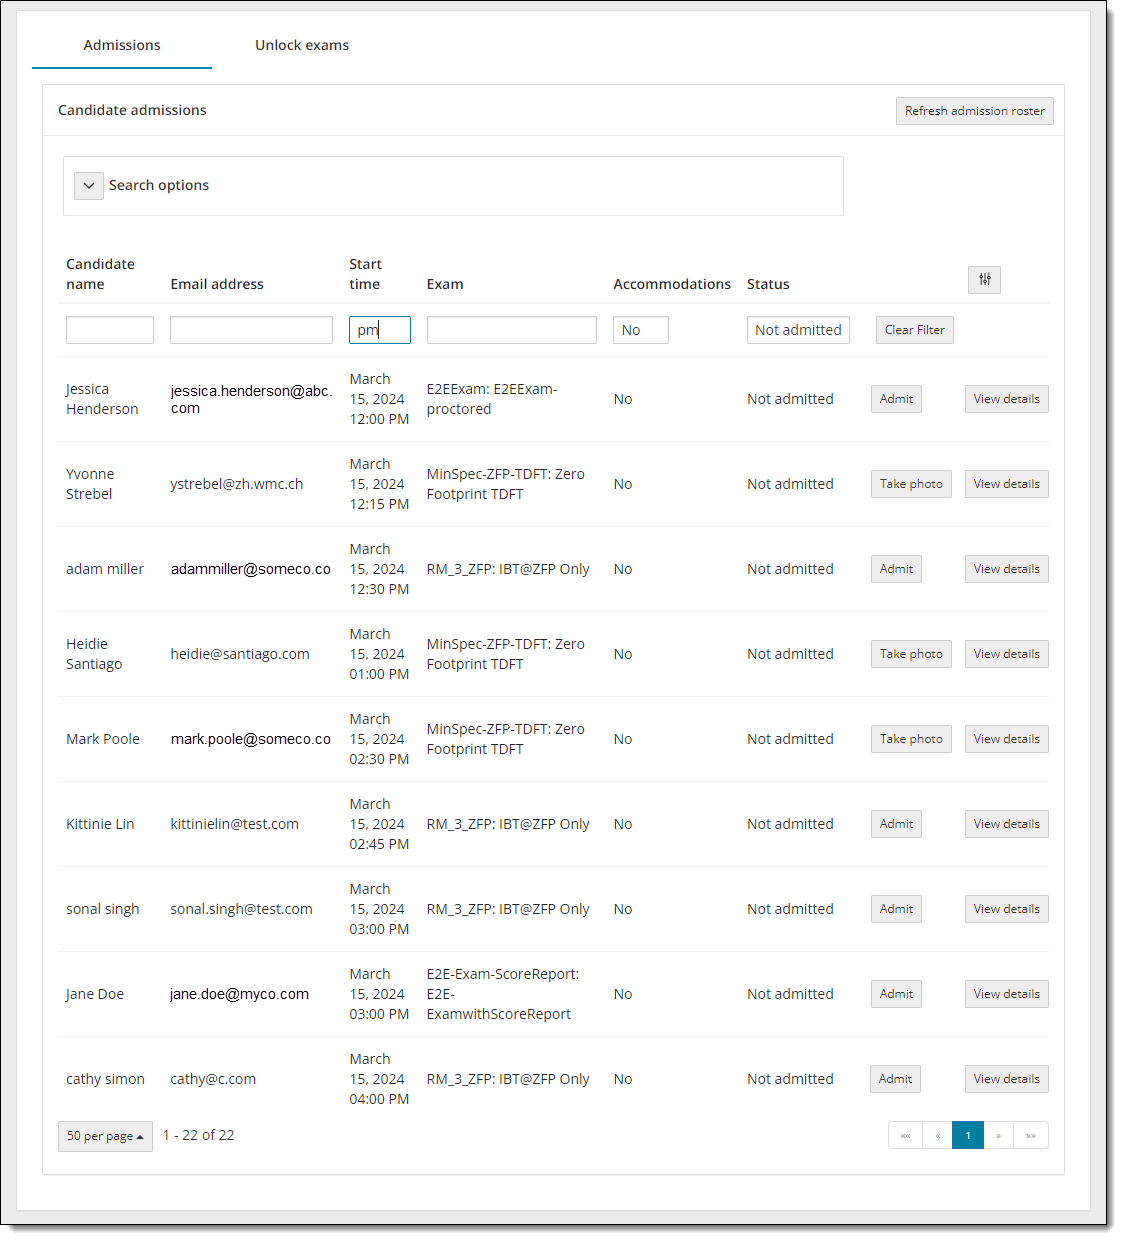
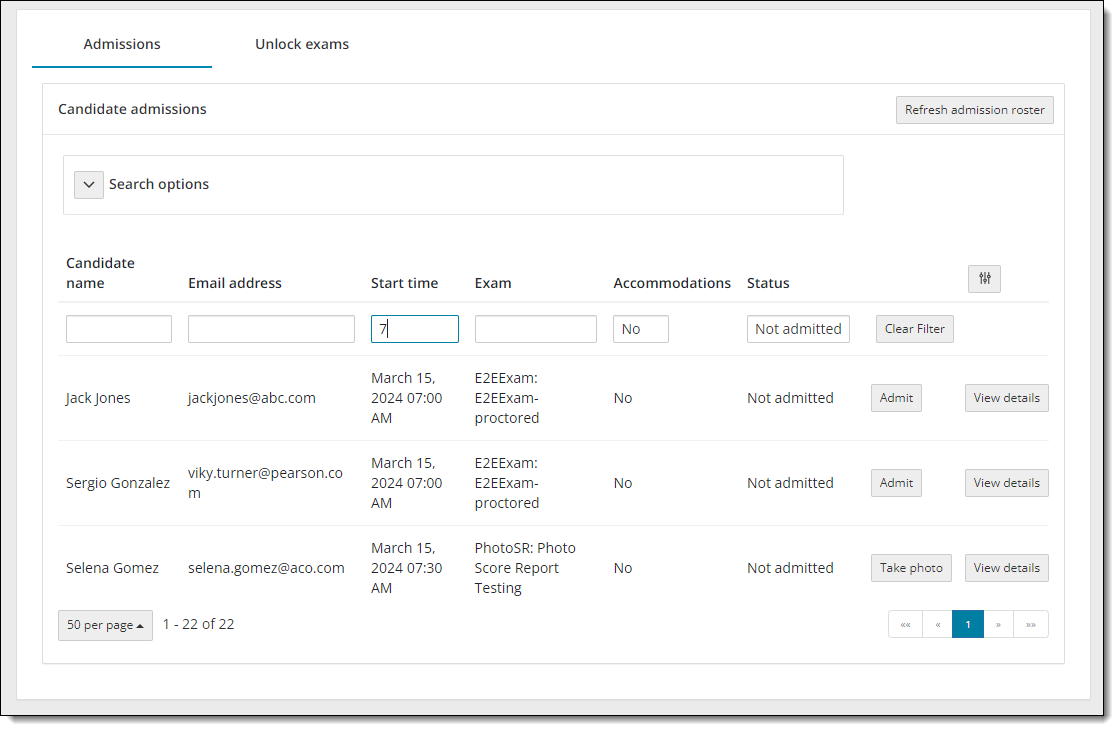
- Enter a number, for example 7. Any exam registration that has a 7 in the start time field is displayed (it could be a day of the month, a number in the year, or in the start time.


- Filter by Exam.
- Filter by Accommodations.
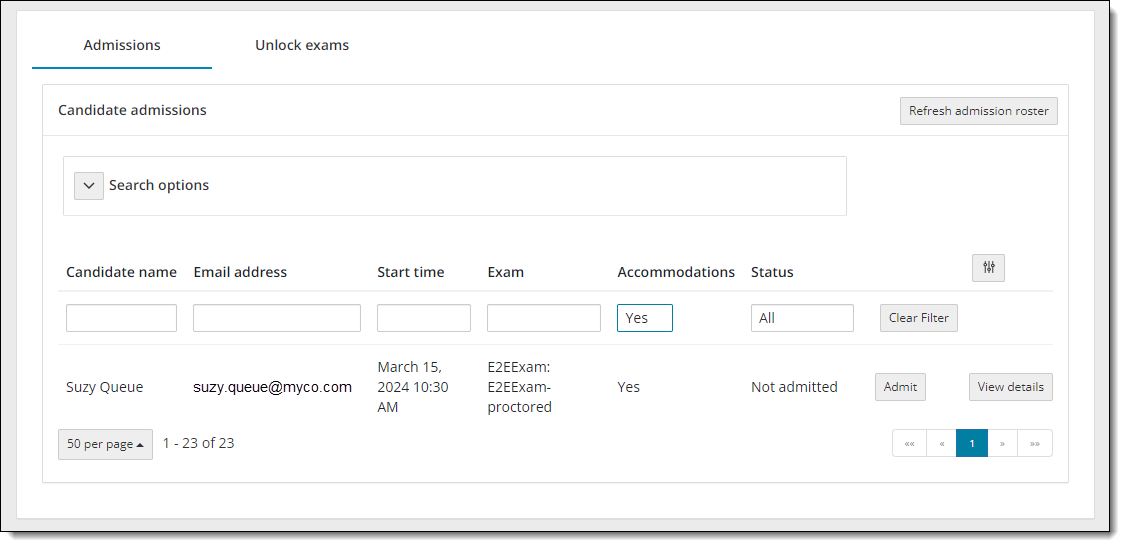
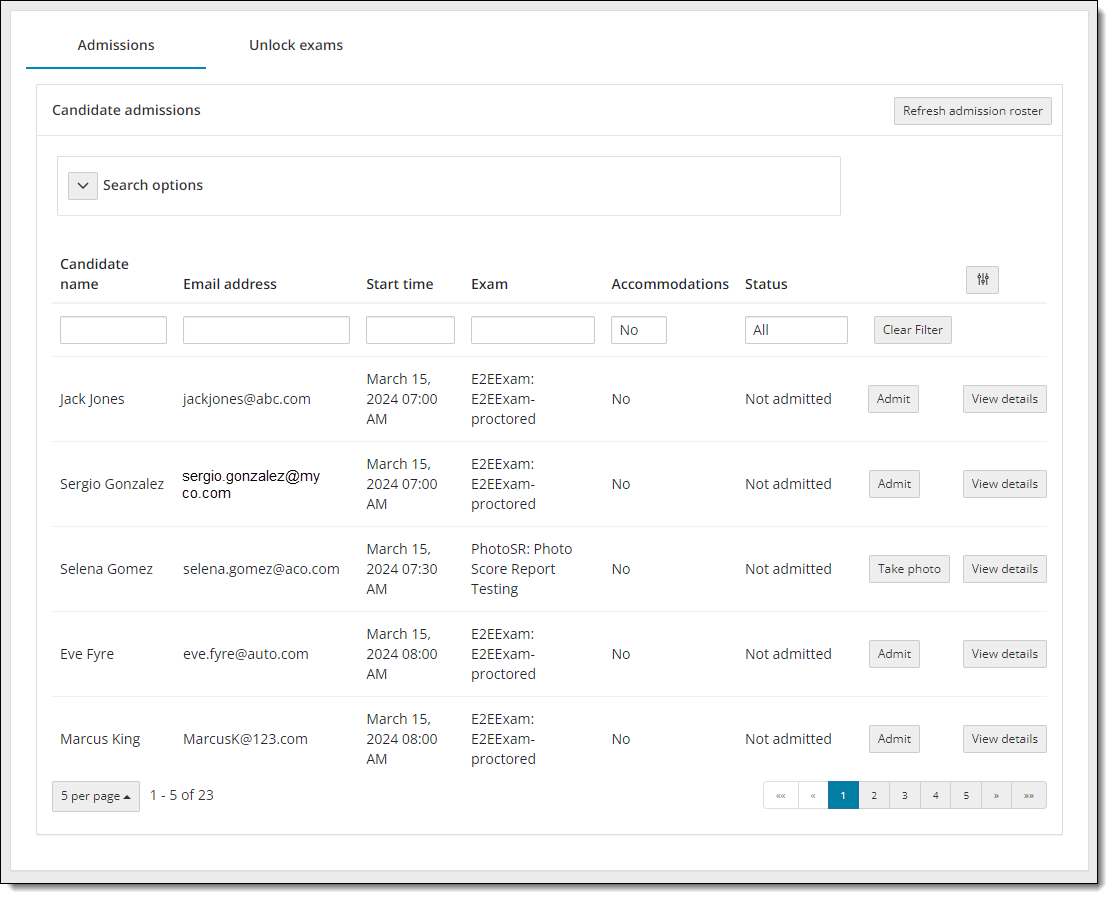
- Click in the Accommodations field. The accommodations list is displayed. Select All, Yes, or No.
- All displays the entire list of exam registrations.
- Yes displays only exam registrations with accommodations applied to the exam.


- No displays only exam registrations without accommodations applied to the exam.


- Filter by Status.
Sort the candidate admissions list
If you have a long list of exam registrations, you may sort the list of registrations by Candidate name, Email address, exam Start time, Exam name, or exam Status. By default, the list is sorted in ascending order by exam Start time. 

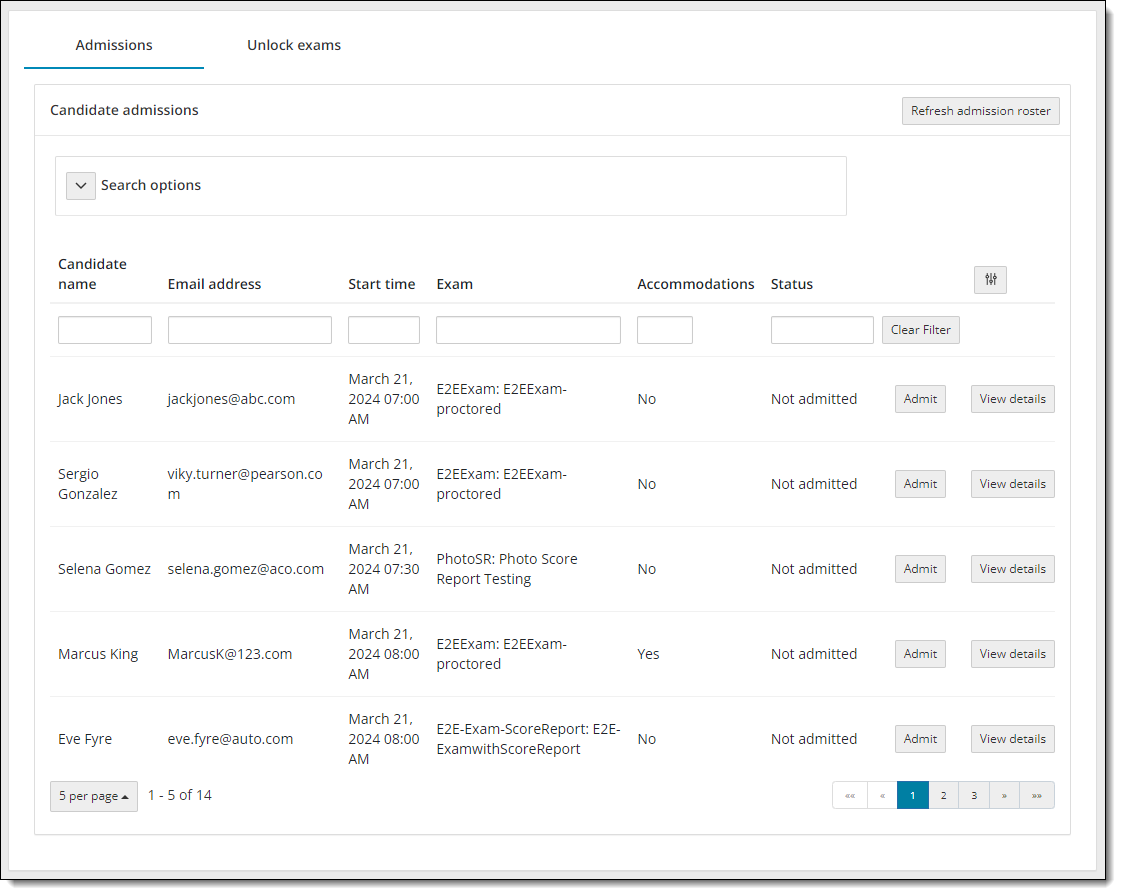
- Sort by Candidate name.
- Click the Candidate name column heading label. An upward facing triangle is displayed to the right of the column heading label and the first page of exam registrations is sorted in ascending order.


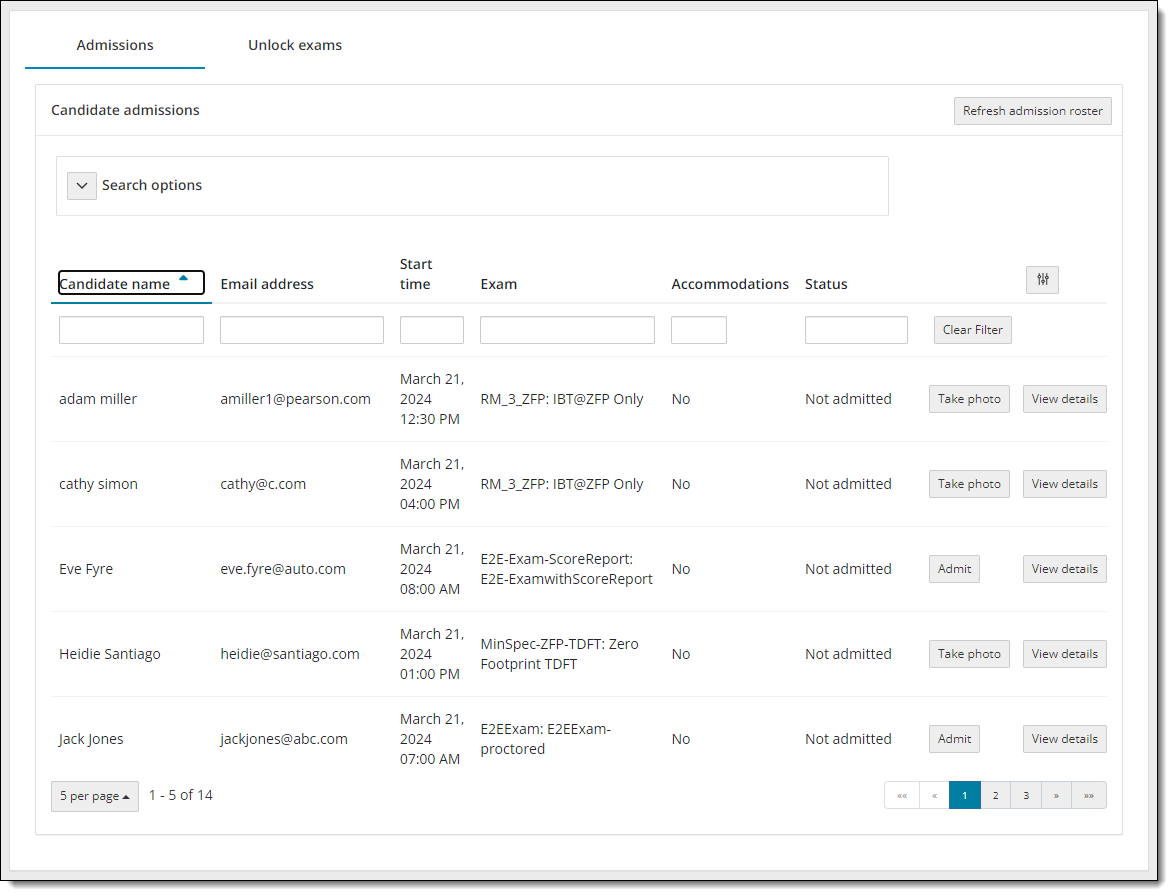
- Click the Candidate name column heading label again. A downward facing triangle is displayed to the right of the column heading label and the first page of exam registrations is sorted by candidate name in descending order.
- Click the Candidate name column heading label. An upward facing triangle is displayed to the right of the column heading label and the first page of exam registrations is sorted in ascending order.
|
When you have a long list of exam registrations, not all the registrations are listed on same page, and you must use the view page buttons in the lower right-hand corner of the screen.
Only the list of registrations that you are viewing on a page are sorted in ascending order by the selected column. If you navigate to consecutive pages, the list is back to displaying the exam registrations in exam start time order even though the column heading displays the sort ascending order icon next to the column heading. You can click the column heading once to display the selected page in descending order and click the column heading a second time to display the page in ascending order. This sorting functionality applies to all the columns when you sort the list. |
- Sort by Email address.
- Click the Email address column heading label. An upward facing triangle is displayed to the right of the column heading label and the first page of exam registrations is sorted by email address in ascending order.


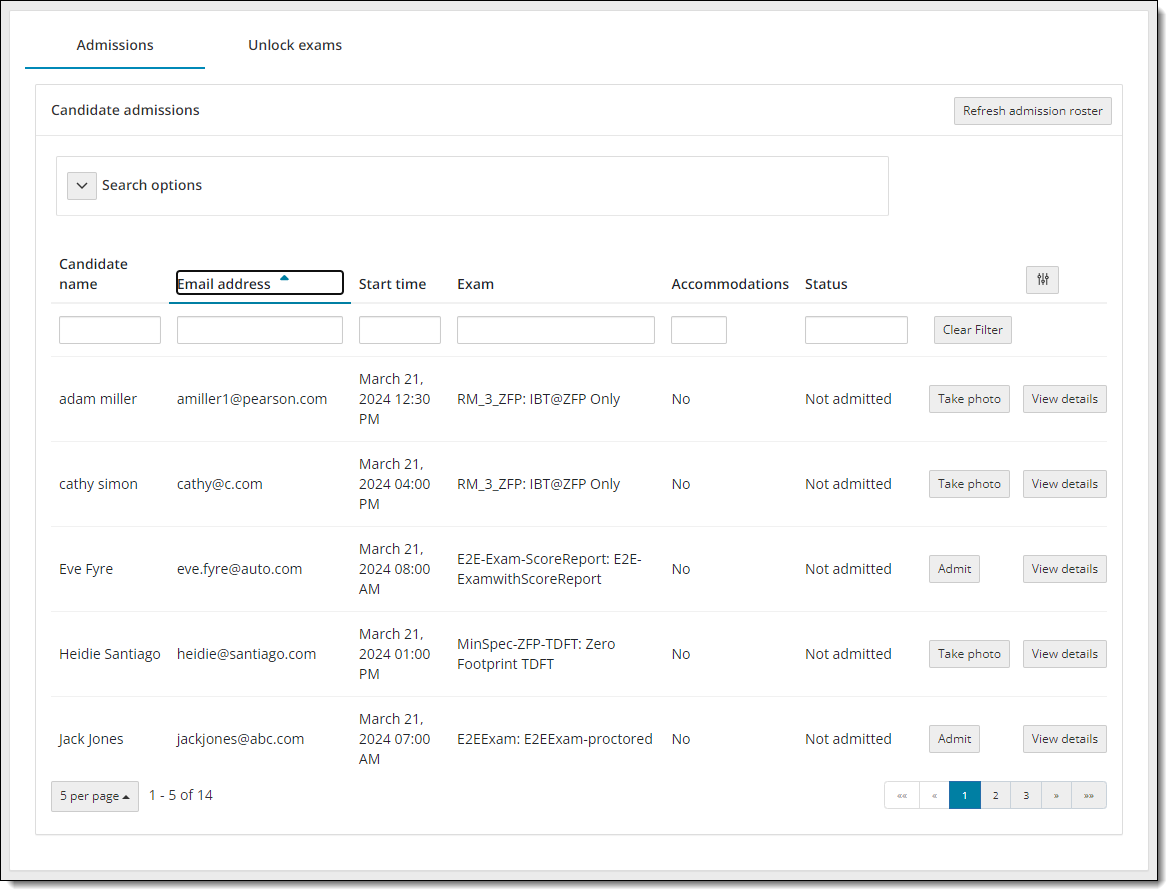
- Click the Email address column heading label again. A downward facing triangle is displayed to the right of the column heading label and the first page of exam registrations is sorted by email address in descending order.
- Click the Email address column heading label. An upward facing triangle is displayed to the right of the column heading label and the first page of exam registrations is sorted by email address in ascending order.
- Sort by Start time.
- Click the Start time column heading label. An upward facing triangle is displayed to the right of the column heading label and the first page of exam registrations is sorted by exam start time in ascending order. When there are multiple exams with the same start time, the system applies a secondary sort by Exam name.


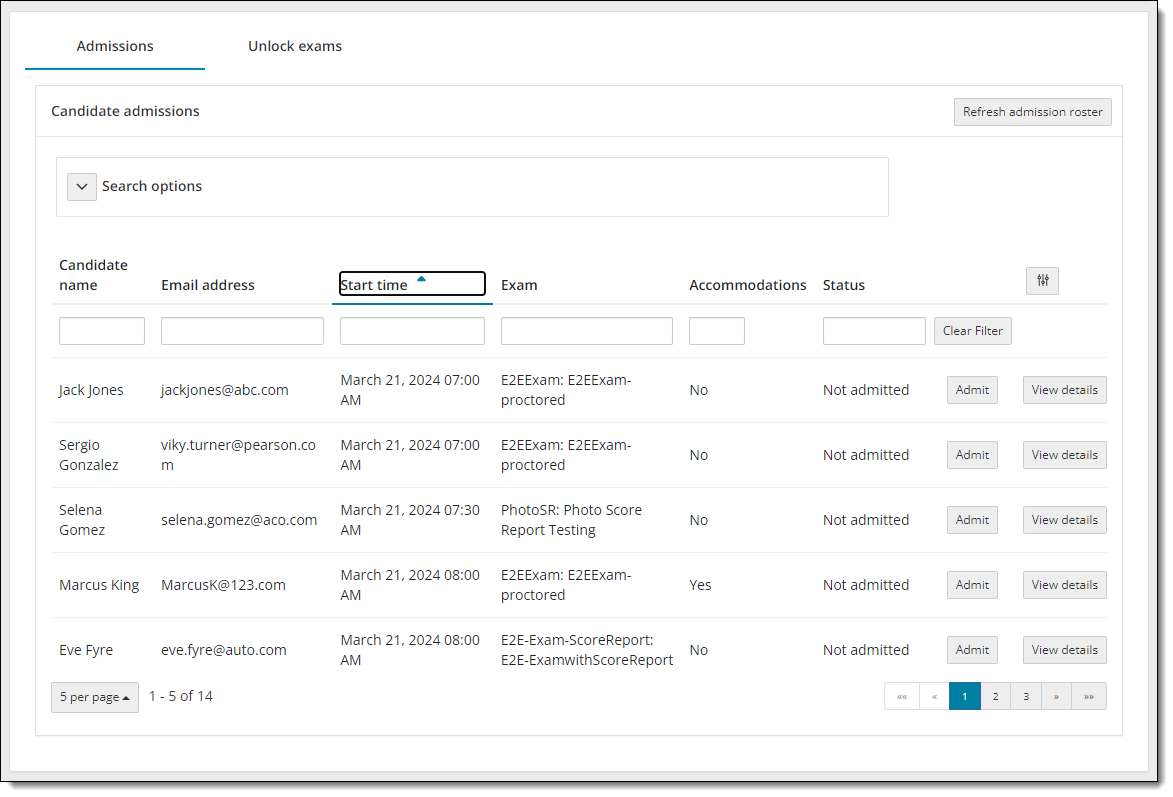
- Click the Start time column heading label again. A downward facing triangle is displayed to the right of the column heading label and the first page of exam registrations is sorted by exam start time in descending order.
- Click the Start time column heading label. An upward facing triangle is displayed to the right of the column heading label and the first page of exam registrations is sorted by exam start time in ascending order. When there are multiple exams with the same start time, the system applies a secondary sort by Exam name.
- Sort by Exam.
- Click the Exam column heading label. An upward facing triangle is displayed to the right of the column heading label and the first page of exam registrations is sorted by exam name in ascending order. When there are multiple exams with the same Exam name, the system applies a secondary sort by exam Start time.


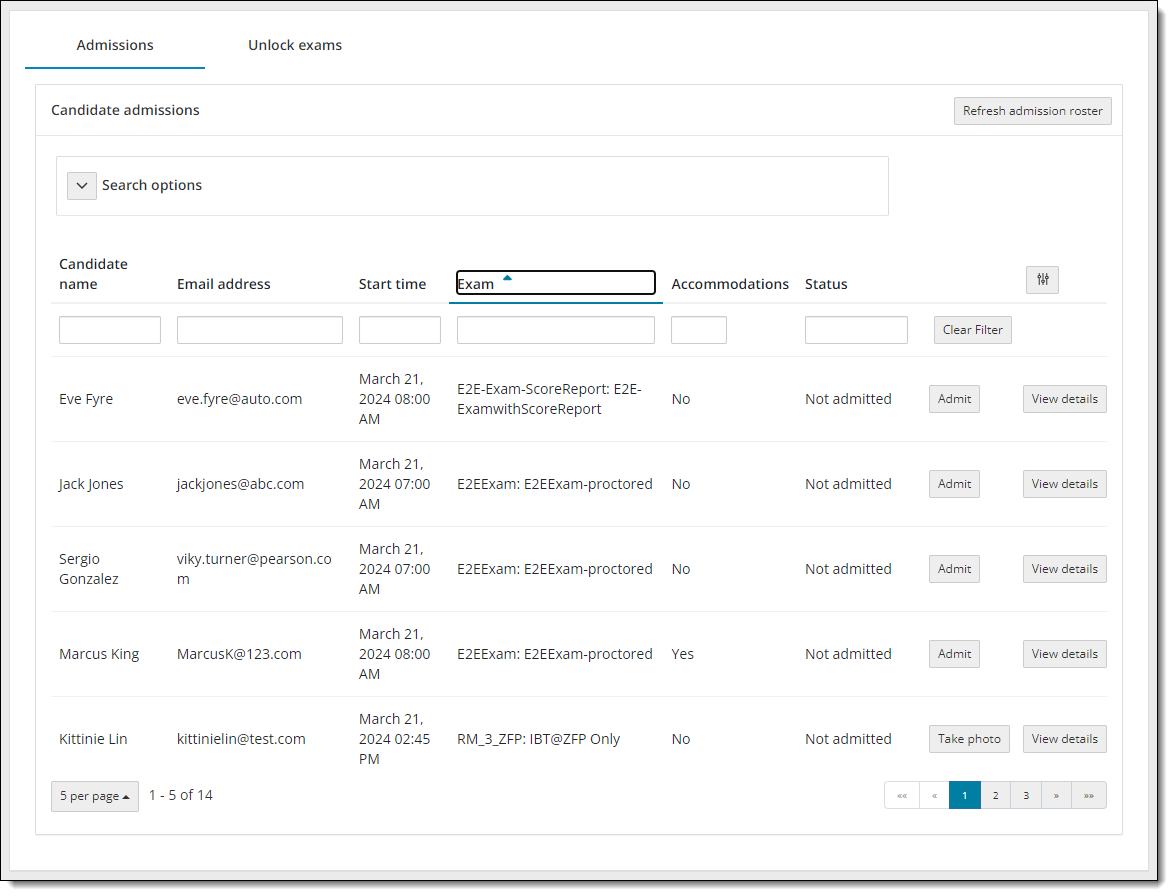
- Click the Exam column heading label again. A downward facing triangle is displayed to the right of the column heading label and the first page of exam registrations is sorted by exam name in descending order.
- Click the Exam column heading label. An upward facing triangle is displayed to the right of the column heading label and the first page of exam registrations is sorted by exam name in ascending order. When there are multiple exams with the same Exam name, the system applies a secondary sort by exam Start time.
|
If there are exam registrations for the same exam name, the system performs a secondary sort by exam start time. |
- Sort by Status. You can sort the exam registrations by the following exam statuses: Admitted, Completed, Exam in Progress, Not admitted, or Unlock requested.
- Click the Status column heading label. An upward facing triangle is displayed to the right of the column heading label and the first page of exam registrations is sorted by exam status in ascending order.


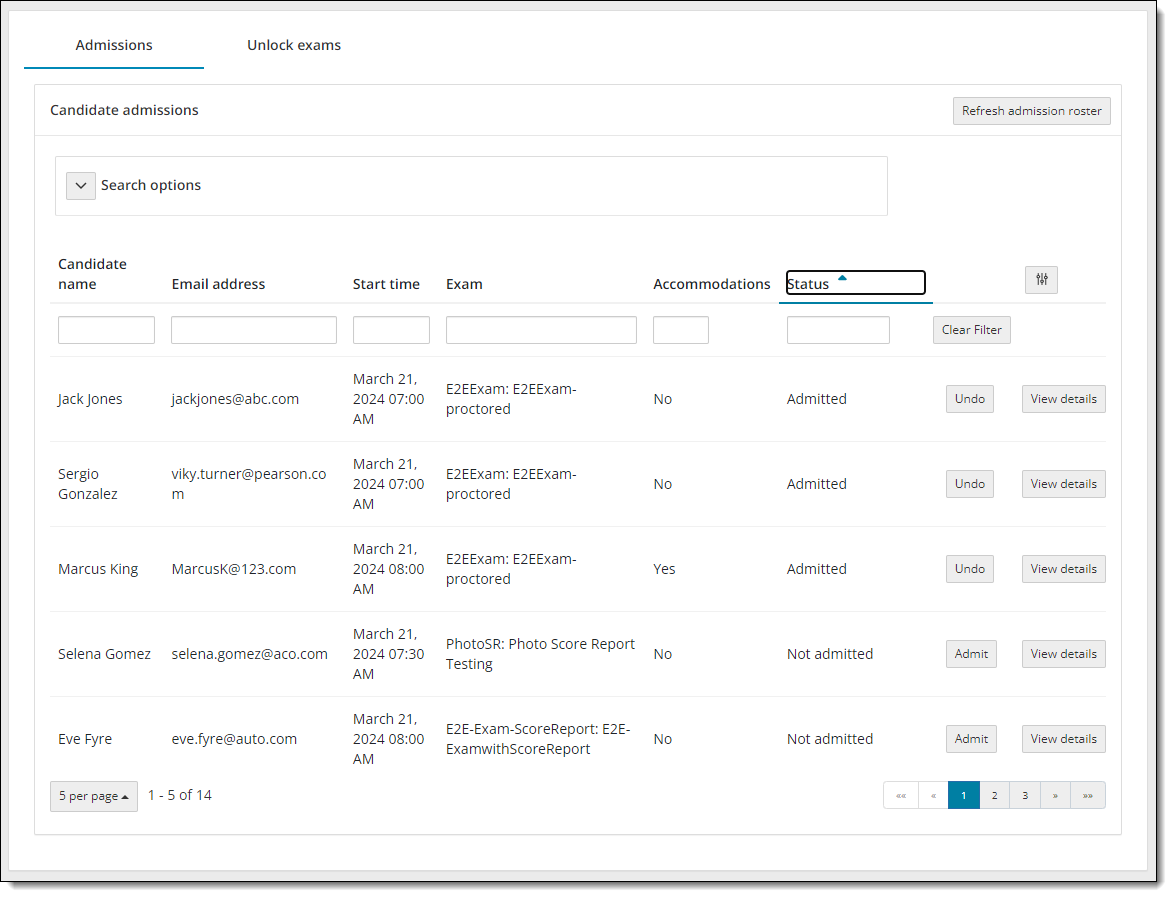
- Click the Status column heading label again. A downward facing triangle is displayed to the right of the column heading label and the first page of exam registrations is sorted by exam status in descending order.
- Click the Status column heading label. An upward facing triangle is displayed to the right of the column heading label and the first page of exam registrations is sorted by exam status in ascending order.
|
When you have a long list of exam registrations, not all the registrations are listed on same page, and you must use the view page buttons in the lower right-hand corner of the screen.
Only the first page of registrations is sorted in ascending order by the Status column. For example, if there are only 10 exam registrations displayed on the page with three registrations in the Admitted status, two in the Completed status, and five in the Not admitted status, the system sorts the exam registrations first by the Status field (Admitted, Completed, and then Not Admitted), second by exam Start time, and then by Exam name if multiple exams start at the same time. If you navigate to consecutive pages, the list is back to displaying the exam registrations in exam start time order even though the column heading displays the sort ascending order icon next to the column heading. You can click the column heading once to display that page in descending order and click the column heading a second time to display the page in ascending order. |
Admit candidate without photo capture required
Clients that do not require a photo of the candidate simply admit the candidate after checking the candidate's ID. If you see the Take photo button on this page, see the Admit candidate with photo capture required section below.
The Candidate details page opens. ![]()
![]()
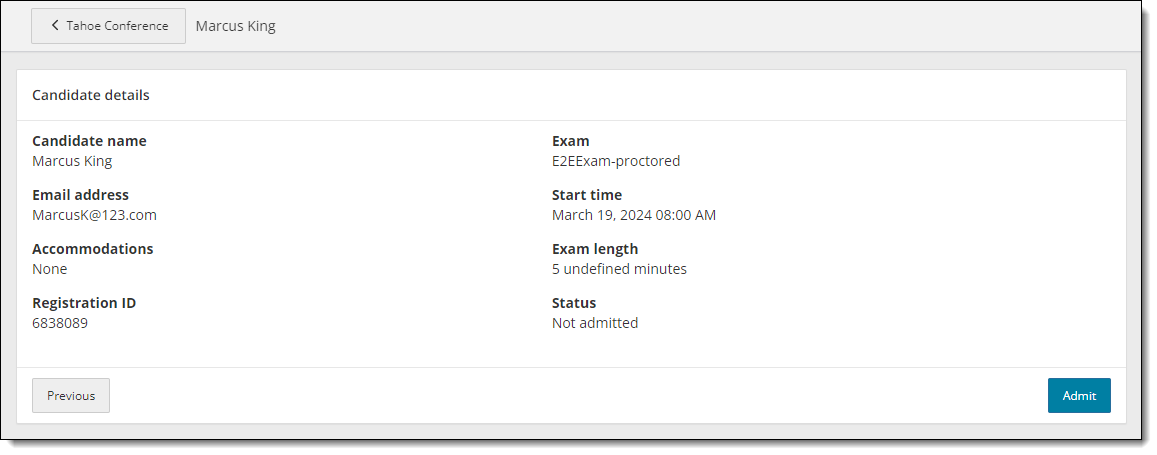
The following information is included on the page:
|
- You may admit the candidate for the exam by clicking the Admit button on this page, or by clicking the Previous button and clicking the Admit button on the Admissions roster.
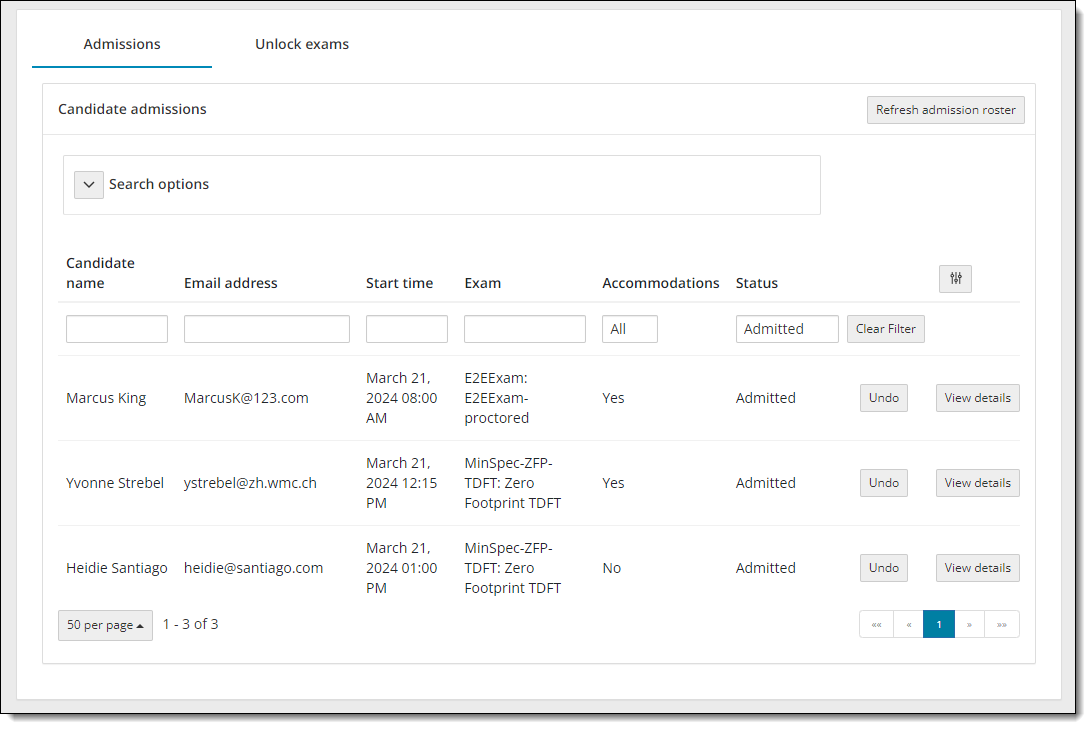
The candidate registration on the Admissions roster is now listed as Admitted in the Status column and the Admit button now says Undo. 

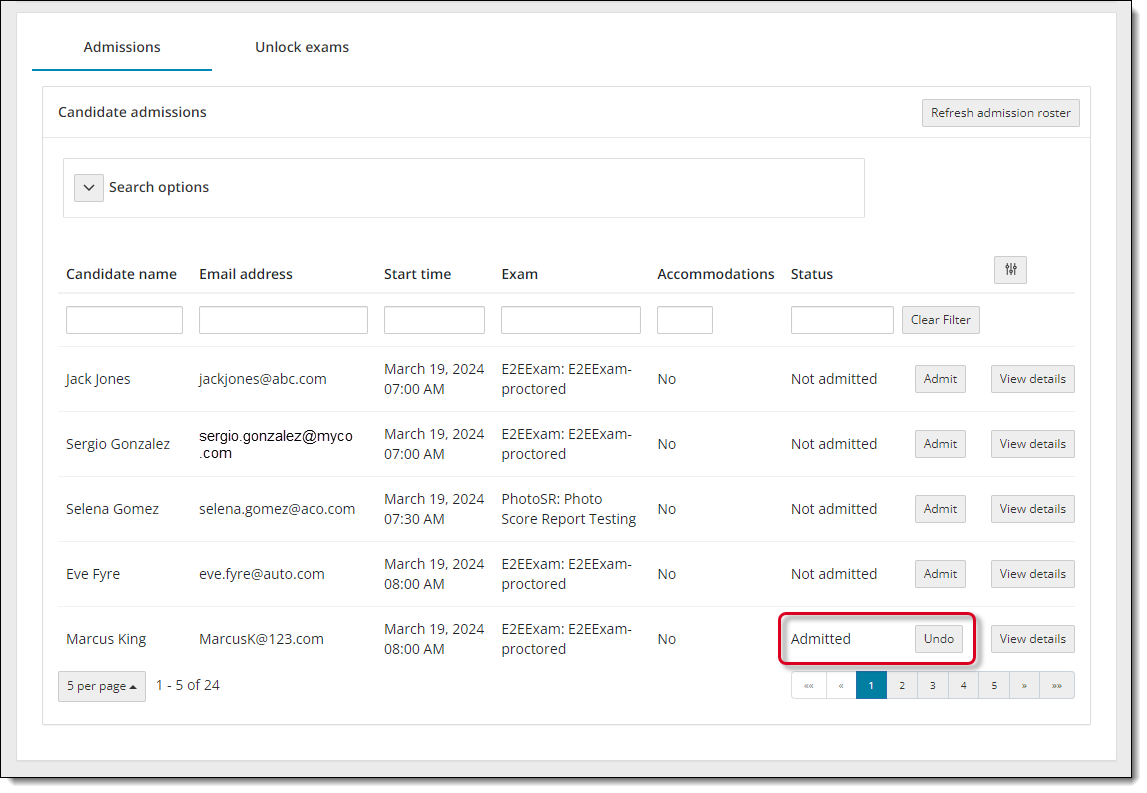
- If you inadvertently admitted the wrong candidate, click the Undo button and the status changes back to Not admitted, and the button changes back to Admit.
- Click the Refresh admission roster button frequently to ensure any new exam registrations appear on the page. Ensure no search filters are applied to the admissions roster so all new exam registrations appear on the candidate admissions list.
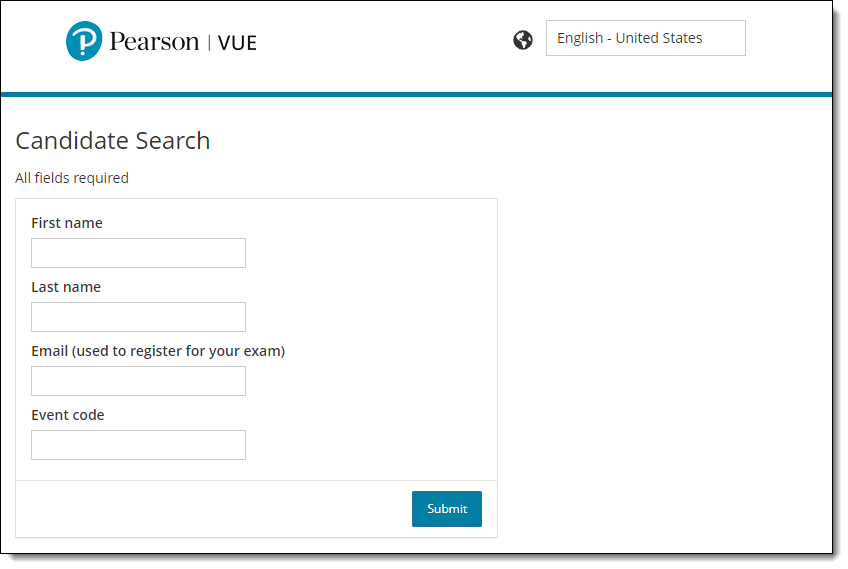
- Once you have admitted the candidate, you must escort the candidate to the exam delivery room and seat them at an exam delivery workstation. Ensure the Secure Browser is open to the Exam Launchpad Candidate Search page for the candidate. See the Client proctored - appointment required user guide for Athena-Browser Edition test driver or Client proctored - appointment required user guide for ITS test driver document for details regarding launching the secure browser.
- The candidate enters their First Name, Last name, Email, and the Event code you supplied them and clicks Submit. This sends an unlock request to the proctor in the event Unlock exams tab.


|
Once the candidate submits the unlock request, the status of the registration on the Admissions tab in the Proctoring application changes to Unlock requested and the exam registration is added to the Unlock exams tab in the Proctoring application. Candidates cannot begin their exam until the exam is unlocked. Proctors must now unlock the exam. See the Unlock Candidate Exams topic for details. |
Admit candidate with photo capture required
Clients that require a photo of the candidate must take a photo of the candidate to admit them after checking the candidate's ID. If you see the Admit button on this page, see the Admit candidate without photo capture required section above.
The Candidate details page opens. ![]()
![]()
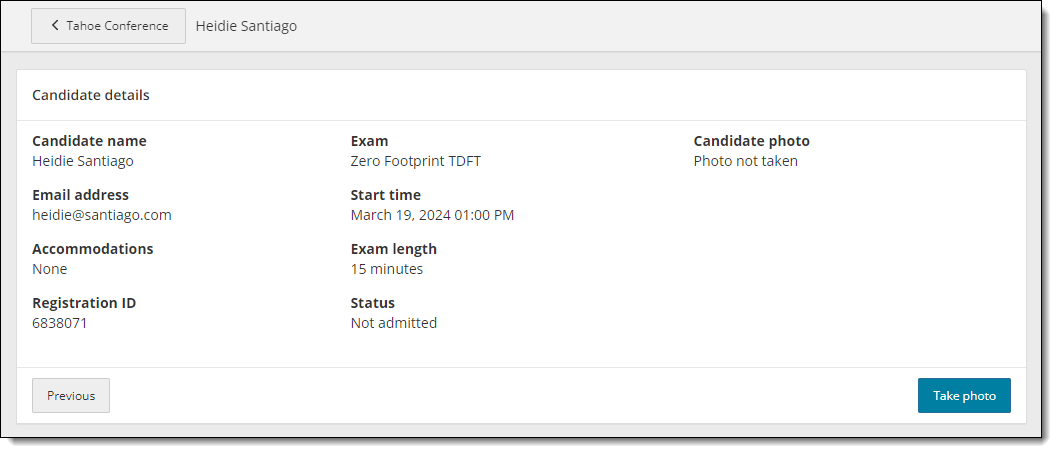
The following information is included on the page:
|
- You may admit the candidate for the exam by clicking the Take photo button on this page, or by clicking the Previous button and clicking the Take photo button on the Admissions roster.
The Candidate photo capture page is displayed. 

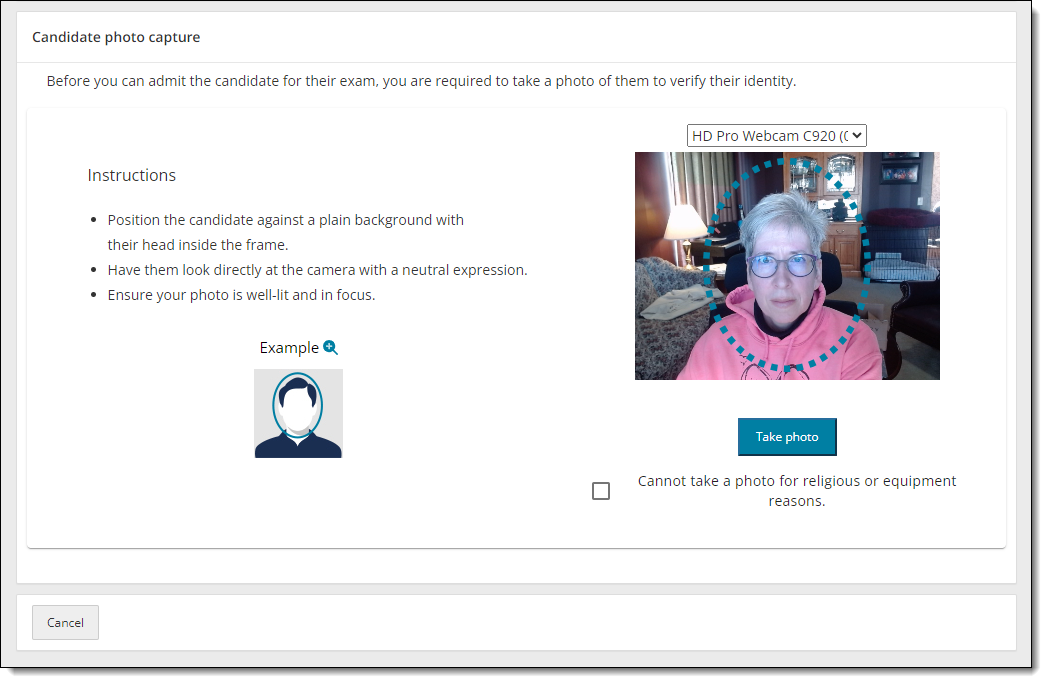
- You must take a photo of the candidate to verify their identity. You may use an external camera or the built-in camera on a laptop.
- Position the candidate against a plain background with their head inside the dotted circle.
- Have the candidate look directly at the camera with a neutral expression.
- Click the Take Photo button.
- The photo is captured. If you did not capture a good photo (e.g., candidate's eyes are closed), you may click the Retake Photo button and take the photo again.


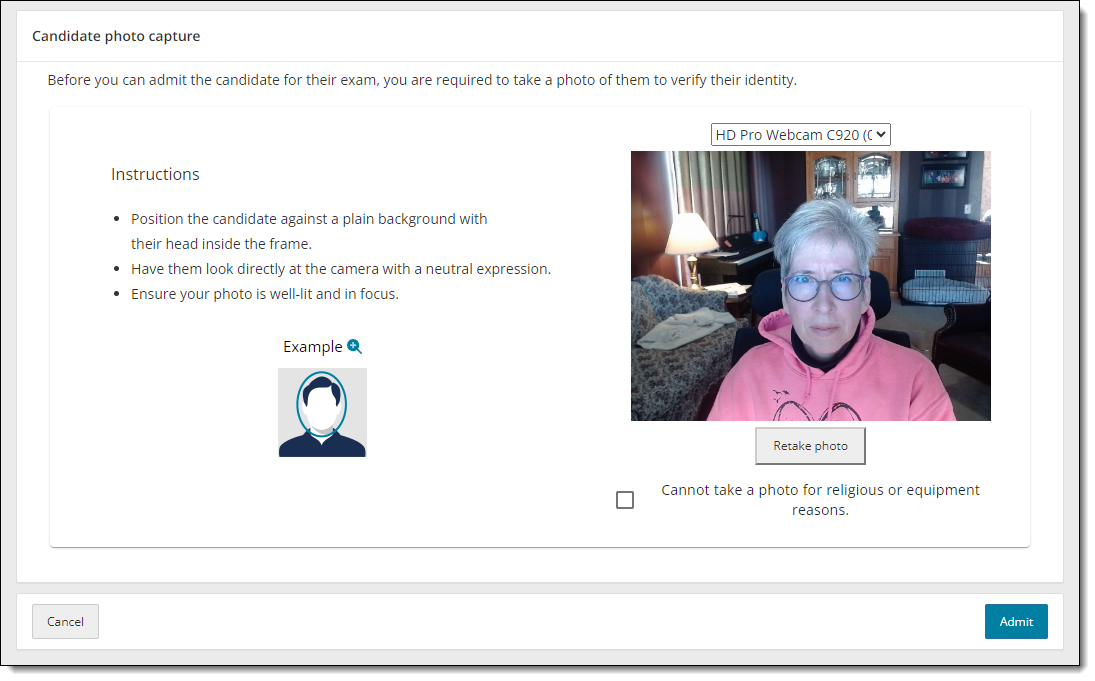
- If there are religious objections to having a photo taken, or if there are issues with the camera preventing you from taking a photo, select the Cannot take a photo for religious or equipment reasons check box.


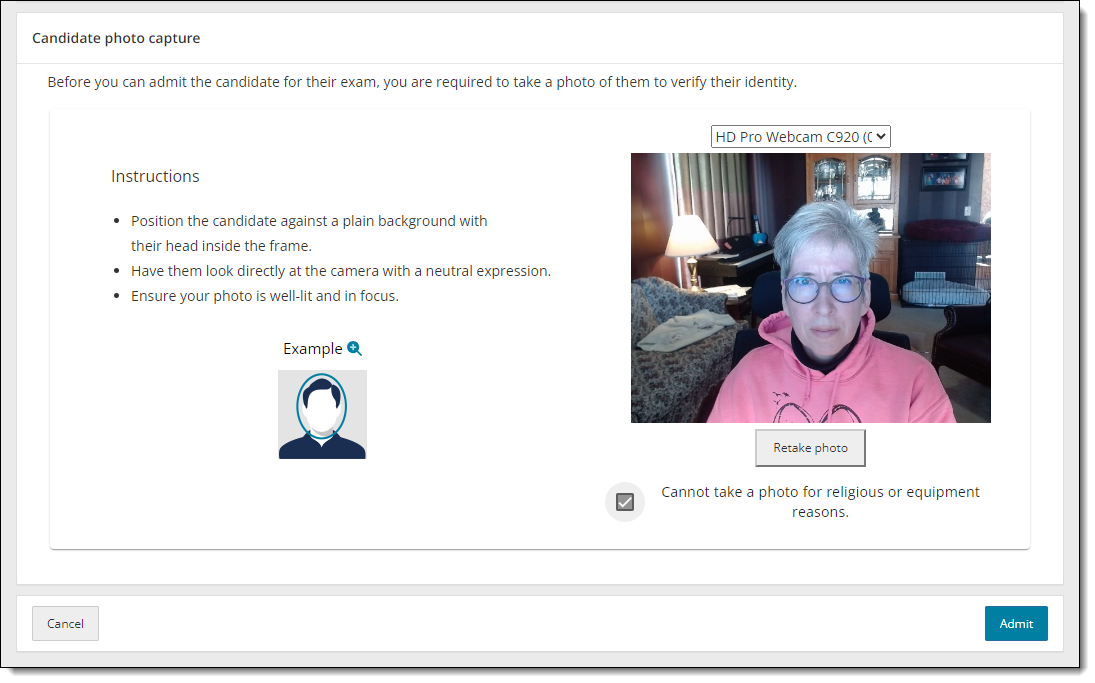
- Click the Admit button.
The candidate registration on the Admissions roster is now listed as Admitted in the Status column and the Take photo button now says Undo. 

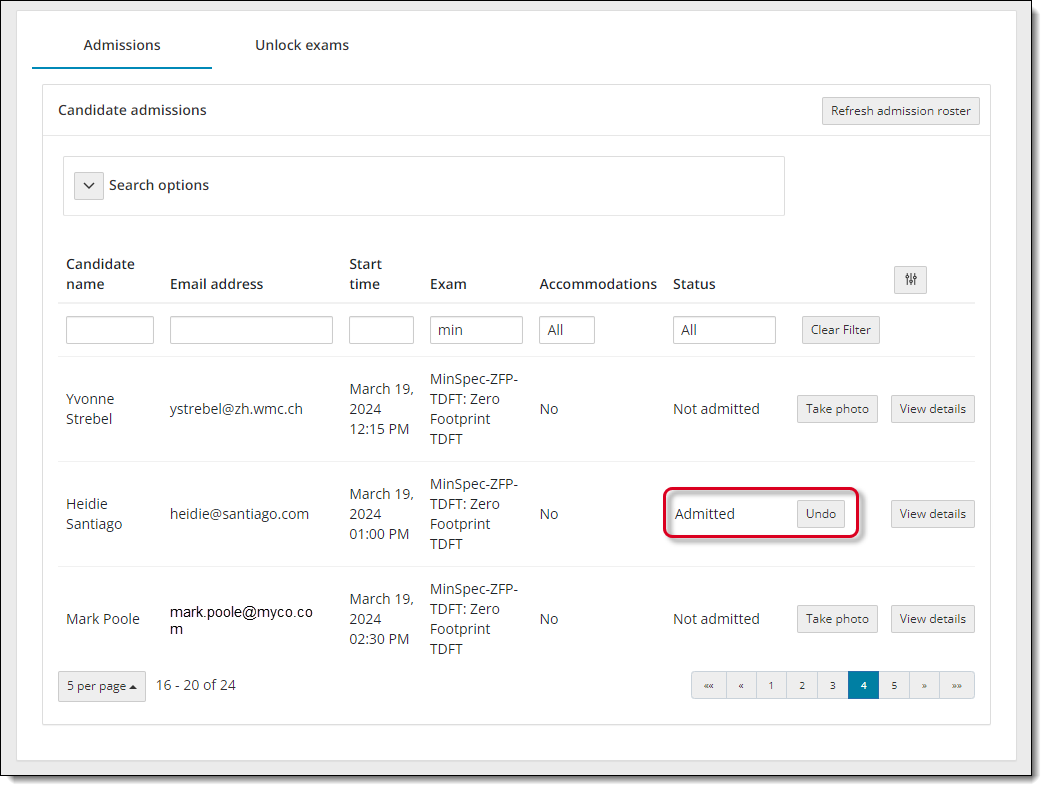
- Once you have admitted a candidate with photo capture, the candidate photo information is displayed on the Candidate details page. Click the View details button. The Candidate photo is displayed, or Photo opt-out is displayed.


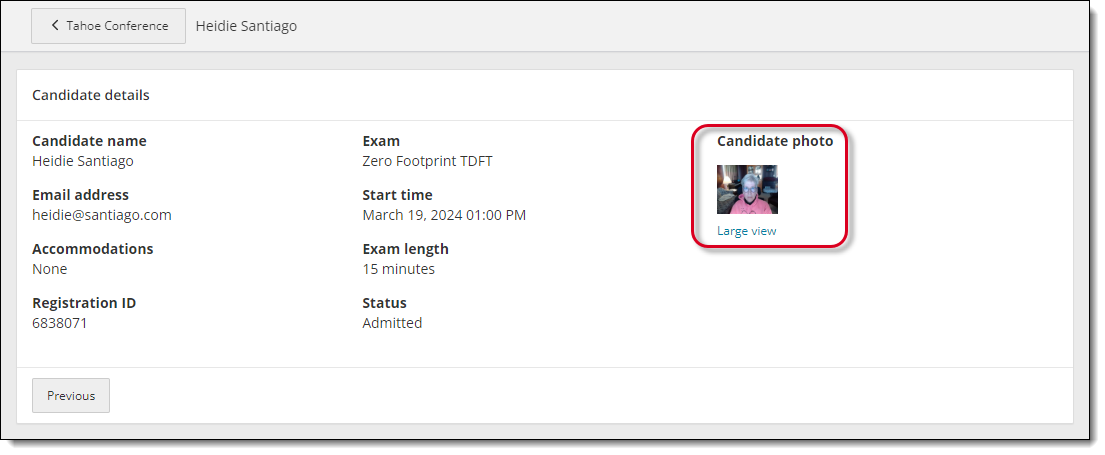
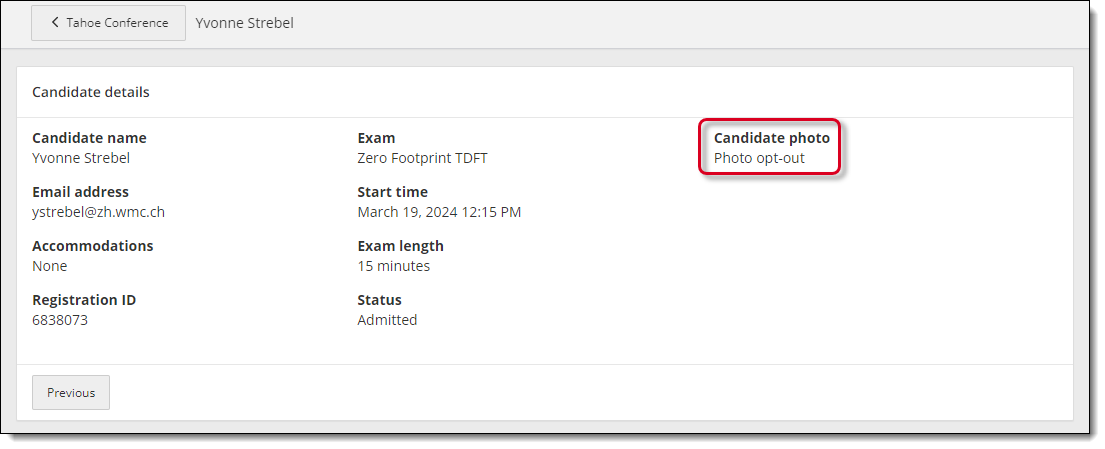
- Click the Previous button to return to the Candidate admissions roster.
- If you inadvertently admitted the wrong candidate, click the Undo button and the status changes back to Not admitted, and the button changes back to Take photo.
- Click the Refresh admission roster button frequently to ensure any new exam registrations appear on the page. Ensure no search filters are applied to the admissions roster so all new exam registrations appear on the candidate admissions list.
- Once you have admitted the candidate, you must escort the candidate to the exam delivery room and seat them at an exam delivery workstation. Ensure the Secure Browser is open to the Exam Launchpad Candidate Search page for the candidate. See the Client proctored - appointment required user guide for Athena-Browser Edition test driver or Client proctored - appointment required user guide for ITS test driver document for details regarding launching the secure browser.
- The candidate enters their First Name, Last name, Email, and the Event code you supplied them and clicks Submit. This sends an unlock request to the proctor in the event Unlock exams tab.


|
Once the candidate submits the unlock request, the status of the registration on the Admissions tab in the Proctoring application changes to Unlock requested and the exam registration is added to the Unlock exams tab in the Proctoring application. Candidates cannot begin their exam until the exam registration is unlocked. Proctors must now unlock the exam. See the Unlock Candidate Exams topic for details. |
Pearson VUE Proprietary and Confidential
 Caution